Showing posts with label tuxedo black. Show all posts

Saturday, December 26, 2015

All Wrapped Up

Good morning! I had made this adorable little gem for the holidays. It's simple, and I adore it. These are perfect cards to send to someone to cheer up their day during the holiday season!


The pops of green and red and against the all white background make it stand it out!


I did use the Crystal Clear Spectrum Noir Sparkle Pen on the snow under and around the envelope. It's so glittery!!


I'd be happy to get this little guy in the envelope! He's too darn cute. I hope you had a wonderful holiday this year and have a fun filled (and safe) new year! Check out Crafter's Companion to shop for your supplies for the New Year. Make a resolution to create all your own handmade cards, or just something fun for yourself!

SUPPLIES USED


Saturday, December 19, 2015

Greetings, Relax!

I love the sentiment on this card today. It's perfect to send to someone who needs a little rest and relaxation in their life ;)


The colors are just bright and fun for this card - perfect for a Midwest winter. And how cute is that image?! 


I used some fun layers behind the main image. Colored with bright colors. And topped it off with a cute little sentiment perfect for anyone. 


Here's a close up of the coloring. I wish you could see the sparkle in the sky that I created with the Spectrum Noir Sparkle Pen!! Hop on over to the Crafter's Companion website to see all the amazing colors available.

SUPPLIES USED

Saturday, November 21, 2015

Dear Santa, Define Good!


Another Christmas card up on the blog today! I ADORE this image and had such fun coloring it, so I hope whoever is the recipient is! :)


How much fun is that?? And the sentiment is perfect especially for little ones. Haha! 


I hope you enjoyed my colorful card today! Check out Crafter's Companion's line of Nordic Christmas items. They're perfect for all projects!!

PRODUCTS USED:

Wednesday, October 7, 2015

Best Witches for Halloween


It's finally October! It's my favorite month of the year with my favorite holiday of the year - Halloween!! Fall is just such a pretty time of year with all the colors all around. So I was inspired to make a fun Halloween card today.

Here is what I created:


This stamp is so much fun to color, and because it has small details you will want to shade, I used my Spectrum Noir Blendable Colored Pencils. The pencils are perfect for getting into smaller places where your markers won't. 

For the image, I actually stamped the witches feet in the cauldron from the Halloween EZ Mount Stamp Set, Best Witches, onto the Ultra Smooth Premium White Cardstock panel I had cut out and used a mask to sponge on the yellow/purple background around it. It is a more intricate stamp to mask out, but it's so worth it! I love the way the sponging looks. I flicked on some white spray mist as well for a little added touch. 


I hope you are inspired to create some spooky greetings for this Halloween! Check out the fun items Crafter's Companion has to offer just for this holiday!! 

SUPPLIES USED:

Saturday, September 19, 2015

Thanks a Bundle

I have another clean and simple card today for a cute thank you note. I can never have too many thank you notes on hand. I use them for so many things and I really think a handwritten note inside a handmade card is very heartfelt!

Today, I've used the Sentimentals, Knit and Stitch set as my main focus. I love the little sewing elements in this set, and nope, I don't sew at all. My mom didn't pass that talent down to me. Ha! I wish I could, but I have other talents that have served me well and that's why I'm here sharing these projects with you, my dear readers.


The embossed piece of cardstock behind the sentiment was created with the Blooming Wonderful Vintage Embossing Folder. It's just so pretty. It's a great way to add a touch of texture to your projects in a simple way!


Here are all the products I've used to create this card:


Visit Crafter's Companion today!


Wednesday, July 29, 2015

Christmas in July

Ho ho ho...wait...Christmas in July everyone! Don't worry, we have 169 more days until then. Sounds far away, right?? Well I like to sneak in holiday cards here and there so it's not so overwhelming when the actual holiday time rolls around. This way, you can do fun things like bake cookies and make gifts, or watch holiday movies! And when you need a card, just grab and go. :)

Here is my Christmas card I have created for today:


It's no secret Bebunni is one of my favorite images to color, so naturally, I grabbed him when I thought of making a holiday card. I used the Bebunni, Rudolph set. I inked him up with my Memento, Tuxedo Black and stamped onto a piece of the Ultra Smooth White Premium Cardstock. I grabbed my Spectrum Noir Blendable Colored Pencils this time to color. I haven't colored with them in a while, so it was nice to get back to using them. I missed them! I used 092, 094, 035, 034, 009, 114, 116, 084, 089, 119, 065, 067, 044, 043, 061 and 063. I blended the colors with the Blending Solution and Paper Stumps. For the shadow under his feet, I did use my Spectrum Noir Markers in BGR1 and the Blender. I also went over that with my Wink of Stella brush pen to give it a bit of shimmer (hard to pick up in the photograph) to mimic snow. 

For the snowflakes around him, I used the snowflake stamps in the Rudolph set and used Memento in Summer Sky to add them in. They're nice a soft and subtle. 

The sentiment is also from the same set and I used Memento in Nautical Blue on a piece of blue cardstock. I cut that out with the Die'Sire Essentials, Circles dies. I added a fun pearl to the dot of the "i" in Jingle. 


It's hard to see in the photo because the cardstock is really dark blue, but I did use the Christmas Patchwork embossing folder on the darkest piece behind the colored image. I love how embossing adds a nice textural element to your projects.

I hope you are inspired to at least sneak in a project here and there this summer to have on hand for the holiday season. It will be here before we know it! Check out all the amazing holiday products you can use at Crafter's Companion

Monday, July 6, 2015

Lawnscaping Challenge #109

Good morning everyone! We have a fun new challenge up today for Lawnscaping Challenges - Sparkle and Shine! So, add bling, Glossy Accents, glitter, or whatever else sparkles and shines. Have fun with this one ;)


The wonderful, fabulous Ellen Hutson! is sponsoring this challenge!!! If you aren't familiar with her and her store, a little bit about the store in her own words:

Ellen Hutson, LLC began their adventure in November 2006 as an online web store committed to bringing you the finest paper crafting products and related product education. They are always looking to provide their customers with quality products, excellent customer service, and education and inspiration for the products they carry. You can shop with Ellen by clicking HERE. As well please join them to be inspired and learn some fun techniques in the CLASSroom, or stay up-to-date on FacebookYouTubeInstagramTwitter, and/orPinterest.

Ellen Hutson has generously offered up a $25 gift certificate to the online store! 
Shopping spree time!  Thank you Ellen and gang!!!


Here is my take on this challenge: 


It's summertime!!! That means there are fireflies out at night, so I was inspired by them for my take on this challenge. I stepped out everything below with supplies included in the steps as well. I hope you enjoyed it and you join us for this Lawnscaping Challenge!


STEPS:

1. Cut white cardstock base and score in the center. Fold to 4.25x5.5.

2. Cut patterned paper (My Mind's Eye 6x6 Pad, Oxford Lane) to 3x5.5. Adhere to the white card base.

3. Cut strip of patterned paper (this is the pattern on the back of the blue cross x's in step 2) and freehand a pennant shape on one end. This is roughly 0.5x4.125. 

4. I took kraft cardstock and used the Lawn Fawn Stitched Labels Lawn Cuts and cut out the oval shape. I stamped "thanks" from the Lawn Fawn Love You A Latte set in Memento, Tuxedo Black. I did curve the stamp just a little bit to fit the oval shape. Best part of clear stamps!


5. I cut a piece of watercolor paper to about 4x4. I dabbed some Distress Ink in Tumbled Glass and Spiced Marmalade onto a clear acrylic block and spritzed with water. Taking my watercolor paper, I pressed that onto the block itself and gently lifted it up. I dabbed the excess ink off with a paper towel. 

6. With the Lawn Fawn Heart Lawn Cuts, I kept them all together as they came packaged, and diecut them out of a scrap piece of heavy cardstock to use as a stencil. I then used a finger dauber and stenciled on hearts in various sizes that I had cut out with Brilliance, Platinum Planet.  


7. I stamped the jar and firefly from the Lawn Fawn Bugs & Kisses set onto some ultra smooth premium white cardstock and cut them out. For the jar, I used a Wink of Stella Glitter Brush Pen in Silver to color the lid. Inside the jar, I used Twinkling H20's to create the yellow "glow" from the firefly's light. I also applied some green glitter glue to give it a little more sparkle! For the firefly, I also used Twinkling H20's to color him in and then applied Glossy Accents just to his wings. After everything dried, I glued the firefly to the jar with some foam adhesive and then adhered the jar to the watercolor background with more foam adhesive. 

8. I then glued the watercolor backdrop with the jar and firefly to the card, centered at the top of the card. I took my patterned strip that I cut and my sentiment in the oval diecut and glued that to the bottom of the watercolor panel. 

PLEASE READ the rules in the sidebar on the Lawnscaping blog in order to be eligible for the prize!!!!!

• You have until Wednesday, July 15th, 2015 to submit your entries!

Don't forget to keep checking the Lawnscaping Challenges Facebook page, where our Facebook Inspiration Team will be sharing projects throughout the challenge!


Saturday, June 13, 2015

Lucky To Have You


Good morning! I have a fun little card here today to share with you. I'll list the products below. I've included several photos to show you all the details and coloring/shading.


1. Cut white cardstock to 4.25x11. Score at 5.5 and fold.

2. Gold paper is cut to 4x5.25 and the corners are rounded. Adhere with Crafter's Companion Extra Strong Permanent Tape Runner.

3. I used a patterened paper from my stash and used the Darice Embossing Folder, Flowers & Vines and ran through my machine. It gives it more texture! I also rounded the corners and adhered to the gold paper.

4. The image is the Bebunni Floral EZ Mount Stamp Set, Lucky You. I stamped it with Memento  in Tuxedo Black onto the White Ultra Smooth Premium Cardstock. I colored him in with my Spectrum Noir Markers in BG2, BG5, BG1, BG10, CR2, CR3, GB5, GB7, GB8, JG1, LG4, LG5, CT2, IG2 and Blender. I then cut him out and set aside.

5. The sentiment is also from the Lucky You set. I used the Die'Sire Essentials, Scalloped Circles to cut out the patterened scallop. I used the Die'Sire Essentials, Circles dies to cut out the sentiment and adhered that to the scalloped circle. I used some rhinestones for the swirled parts of the letters in the word LUCKY. I also used one in the center of the shamrock.

6. I used foam adhesive squares to adhere the sentiment circles and then Bebunni. I snuck his foot behind the sentiment.


I hope you enjoyed my card today! Please visit Crafter's Companion for more Bebunni sets and other amazing products!

Saturday, April 25, 2015

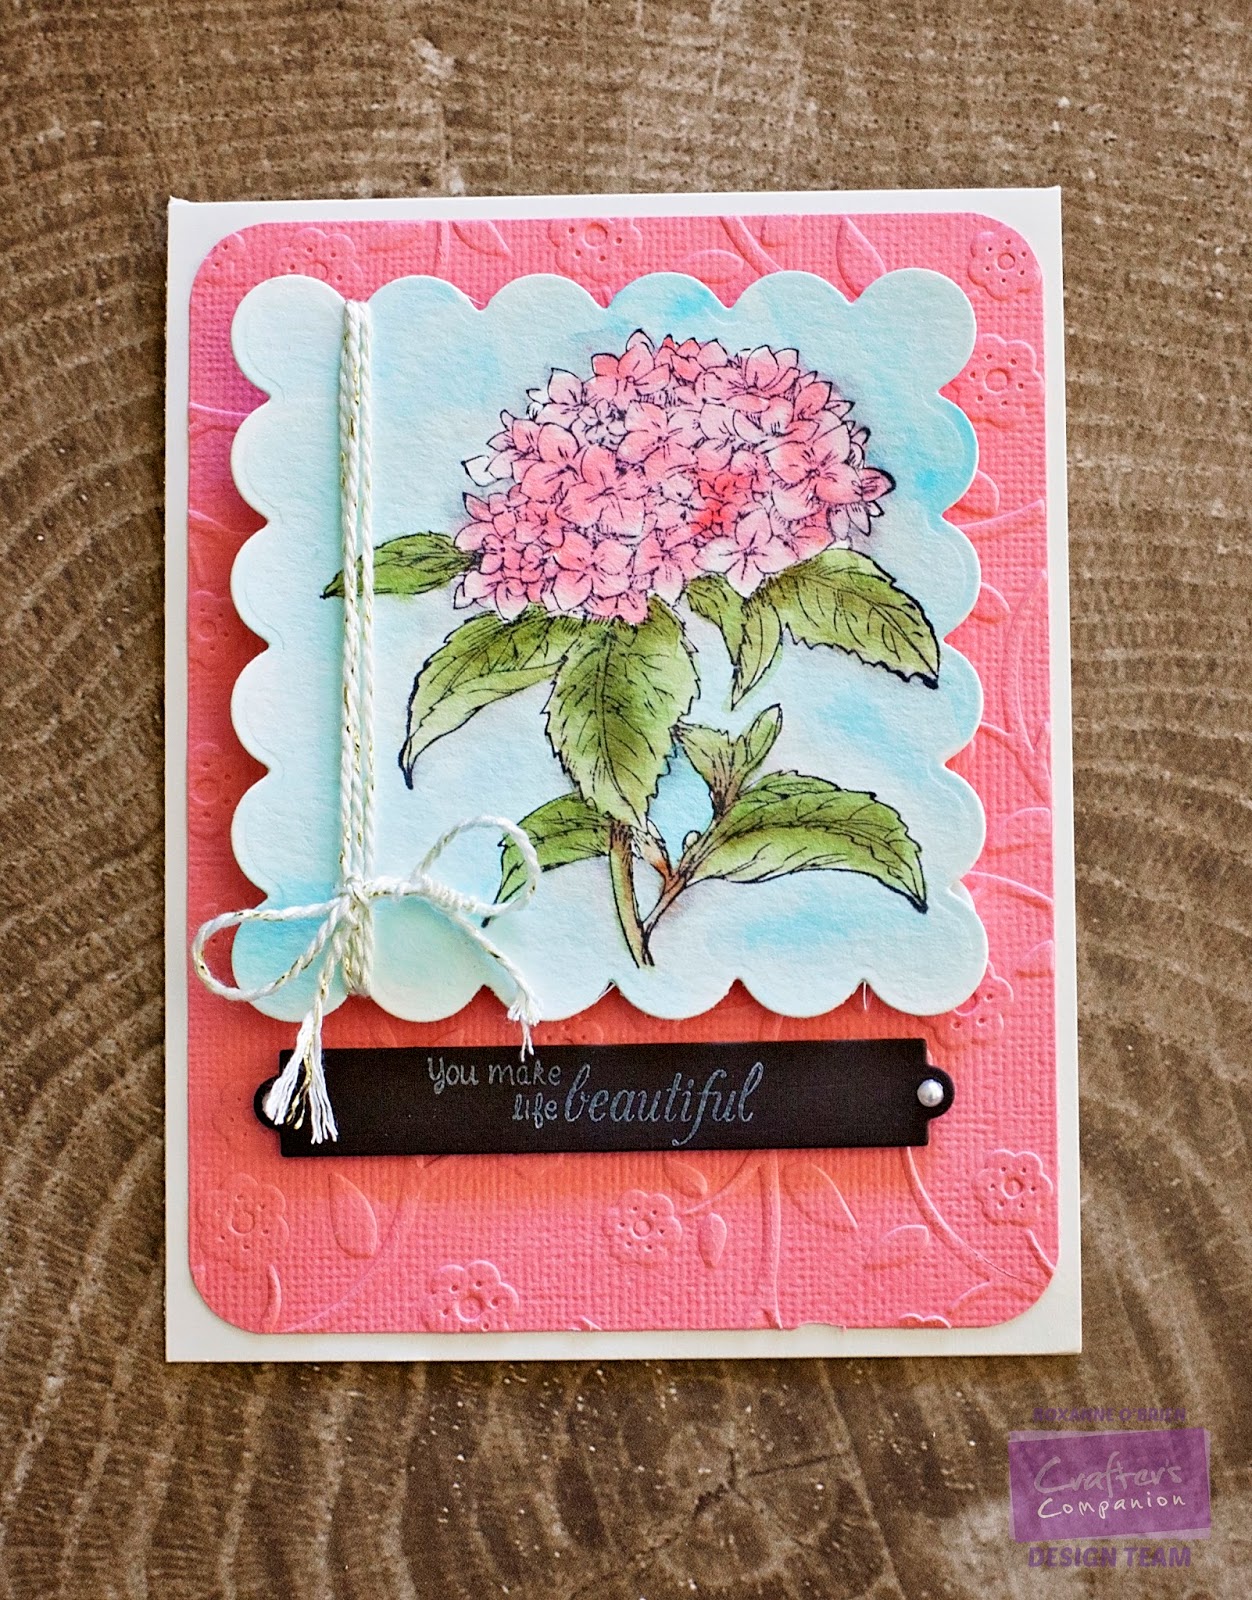
Beautiful Hydrangeas


Nothing says spring like flowers to me. I chose the hydrangea image from the Stamp-It Australia, Floral Fancies set. I diecut the watercolor paper using my Die'Sire Essentials, Scalloped Squares die (the largest one) and stamped the image onto it, moving it flush right, with Memento, Tuxedo Black. I then colored it in using Spectrum Aqua Watercolor Markers in Aquamarine (background), Moss, Leaf Green, Chocolate, Blossom, Begonia and Slate (shadowing). 


I used some pretty white/gold twine in my stash and tied it around the left side of the diecut square.
For the pink background, I used a color that coordinated with the hydrangeas I colored, and used the Flowers & Vines embossing folder. I then rounded the corners and adhered to my card base. I then used foam adhesive to glue the hydrangea square to the pink embossed background. 


The sentiment is from the Bebunni Floral Collection, Flower Garden. It's just a pretty and soft font! I used Memento Luxe in Wedding Dress to stamp it onto the diecut banner piece. I used simple white pearls on the ends to dress it up. 

I hope you enjoyed this card! This would be perfect for Mother's Day coming up. Click on over to Crafter's Companion to see all the beautiful sets you can use to create your Mother's Day card and gifts!

Saturday, April 18, 2015

Hello Hibiscus


Hello! I have a fun and bright card to share today. I have stepped out how I created this below along with links to each supply I used from Crafter's Companion


1. Cut/score orange cardstock base to 4.25x5.5. 

2. Cut small strips of Shimmering Cardstock in Green Envy. Set aside. 

3. Cut sheet for watercolor images. I wanted to create my own patterned paper with this card using a lot of color, so I stamped the small hibiscus image from the Stamp-It Australia, Floral Fancies set with Memento, Tuxedo Black. I used Spectrum Aqua Watercolor Markers to color them in. I referenced images on Google for different colors these gorgeous flowers. I used Yellow, Sunset, Spice, Gold, Amber, Orchid, Heather, Wildflower, Begonia, Blossom, Orange, Rose, Pink, Crimson, Burgundy, Scarlet and Red Violet. To make it look like a true patterned paper, I used Sea Green to color in around the flowers. I love the way this came out, so I'll be doing this technique way more often! 

4. To make a soft sentiment focal point on this bright and busy background, I used a small piece of vellum and diecut it using the Die'Sire Essentials, Rectangles and I embossed it using the top of the Embossing Folder, Christmas Elegance. I used the extra strong permanent tape runner behind where I glued the sentiment to hide it.

5. I then used some little enamel dots for interest on the sheer piece. 

6. I assembled it all and there you go!


Monday, April 6, 2015

Lawnscaping Challenge #103: Dimension

Good morning! We have a new challenge over at Lawnscaping today. This one is really fun - DIMENSION. See details in the image below.


The sponsor for this challenge is Ellen HutsonThe prize? A $25 gift certificate to the online store! 

Here is what I created for the challenge: 


I embossed a shimmery blue cardstock for the background. Then I built my little scene. I round cornered some white cardstock and used the green dotted paper from Lawn Fawn 6x6 Let's Polka Petite Paper Pack. I took the top of the green piece I cut out and just snipped the top to look like grass! I thought it was super cute. I then rounded the bottom corners and adhered to my white piece.

I used a yellow strip from the Sweater Weather Petite Paper Pack for the top of the piece. 

I took the sentiment, we bee-long together, and curved it on my acrylic block and stamped it onto the white piece with Memento in Tuxedo Black


For the bees, I stamped them first onto the white cardstock one at a time. I took Memento in Rose Bud to stamp the heart/dotted line image from the Lawn Fawn Bugs & Kisses set and then stamped the other bee at the other end. The bees were them stamped onto the same white cardstock and colored in with my Spectrum Aqua Watercolor Markers. I took the Aquamarine marker and used a water pen to apply a slight glow around the bee image stamped onto the white piece. It gave a little highlight to each bee. For the wings, I used my Wink of Stella pens in Silver and Clear to add in some glittery accents. I also used a Black Spica pen on the bee stripes, facial features, and antennae. I used foam adhesive to pop them up off the base. 


I needed a little dimension in the center of the heart, so I stamped the same heart/dotted line image onto the pink heart paper from the Lawn Fawn 6x6 Let's Polka Petite Paper Pack and adhered that with foam adhesive in the center. 

I hope you play along with the challenge! Be sure to follow the rules for the challenge and upload your project to the blog post! Good luck and have fun creating. 

Saturday, March 21, 2015

Heartfelt Wishes


Another one of my favorite series of stamps is up on the blog today. I used Moonbeam Meadow, Hugs & Kisses for this card. The mice are just too cute for words. I inked up my stamp with Versafine, Onyx Black using the Rock-A-Blocks and stamped it onto some standard watercolor paper. 


I then colored my image in with my Spectrum Aqua Markers (Slate, Sepia, Desert, Blossom, Bud Green, Magenta, Spice, Amber, Marine, Evergreen, Sunflower, Wildflower, Terra Cotta, Chestnut and Meadow). I cut it out using my Die'Sire Essentials, Circles dies. 

Now it's time to add some fun details! I used the Die'Sire Essentials, Scalloped Circles with a blue dotted paper and glued my colored image to that. I then pulled some coordinating papers out of my stash to build my card.


For the sentiment, I colored in the wood veneer shape with the Spectrum Aqua Markers to match the mice, and stamped the sentiment onto there from the same set.


Easy and totally sweet little card. This could be perfect for an anniversary, engagement, or wedding. Check out all the Moonbeam Meadow sets at Crafter's Companion!

Lawn Fawnatics Challenge #8: Summertime Fun

  It's challenge time over at Lawn Fawnatics! This is challenge #8 which is summertime fun.  I mean, we are in the thick of summe...