Monday, September 23, 2013


Hi there! I've got a fun little project you can whip up for a family member for the holidays. 

This was a mini scrapbook I made out of some old stock I had on hand and some fun holly and berries I had as well along with a little holiday ribbon. I love using up what I have on hand to make it into something fun and unexpected! I just took several sheets of 12x12 cardstock and cut them in half and folded in the center, so you have a 6x12 little mini book. The ribbon becomes the "binding" so to speak. That's it! Very simple to mass produce too. 

I chose the sentiment "holiday memories" from the Sentimentals set Jingle Bells and punched it out with a circle punch (1-1/2" I believe I used) and used pop dots to adhere. 

I colored this adorable little guy for the cover. He's from the Makey Bakey Mice set-Christmas Seasons. I love them all! I used my Spectrum Noir markers to color him in (CG3, GT2, LG5, IG1, TN7, TN8, EB8, TN2, PP5, DR5, DR7, BG1, FS6, blender pen) and then fussy cut him out. I used some red rhinestones from my stash for the holly on his hat.


On the inside, I used various sentiments from the Sentimentals sets Jingle Bells and Mistletoe Kisses. These sets are seriously worth buying the bundle!!! I used Delicata-Golden Glitz (coming soon) and Memento Luxe ink-Pistachio (coming soon) for sentiments. You can use these for SO many things-cards, scrapbooks, custom wrapping paper, gift tags, boxes, I could go on and on...

I have a few shots of the inside of the book as well as a few more of the outside so you can see the detail! Thanks for stopping by and please be sure to visit Crafter's Companion today!


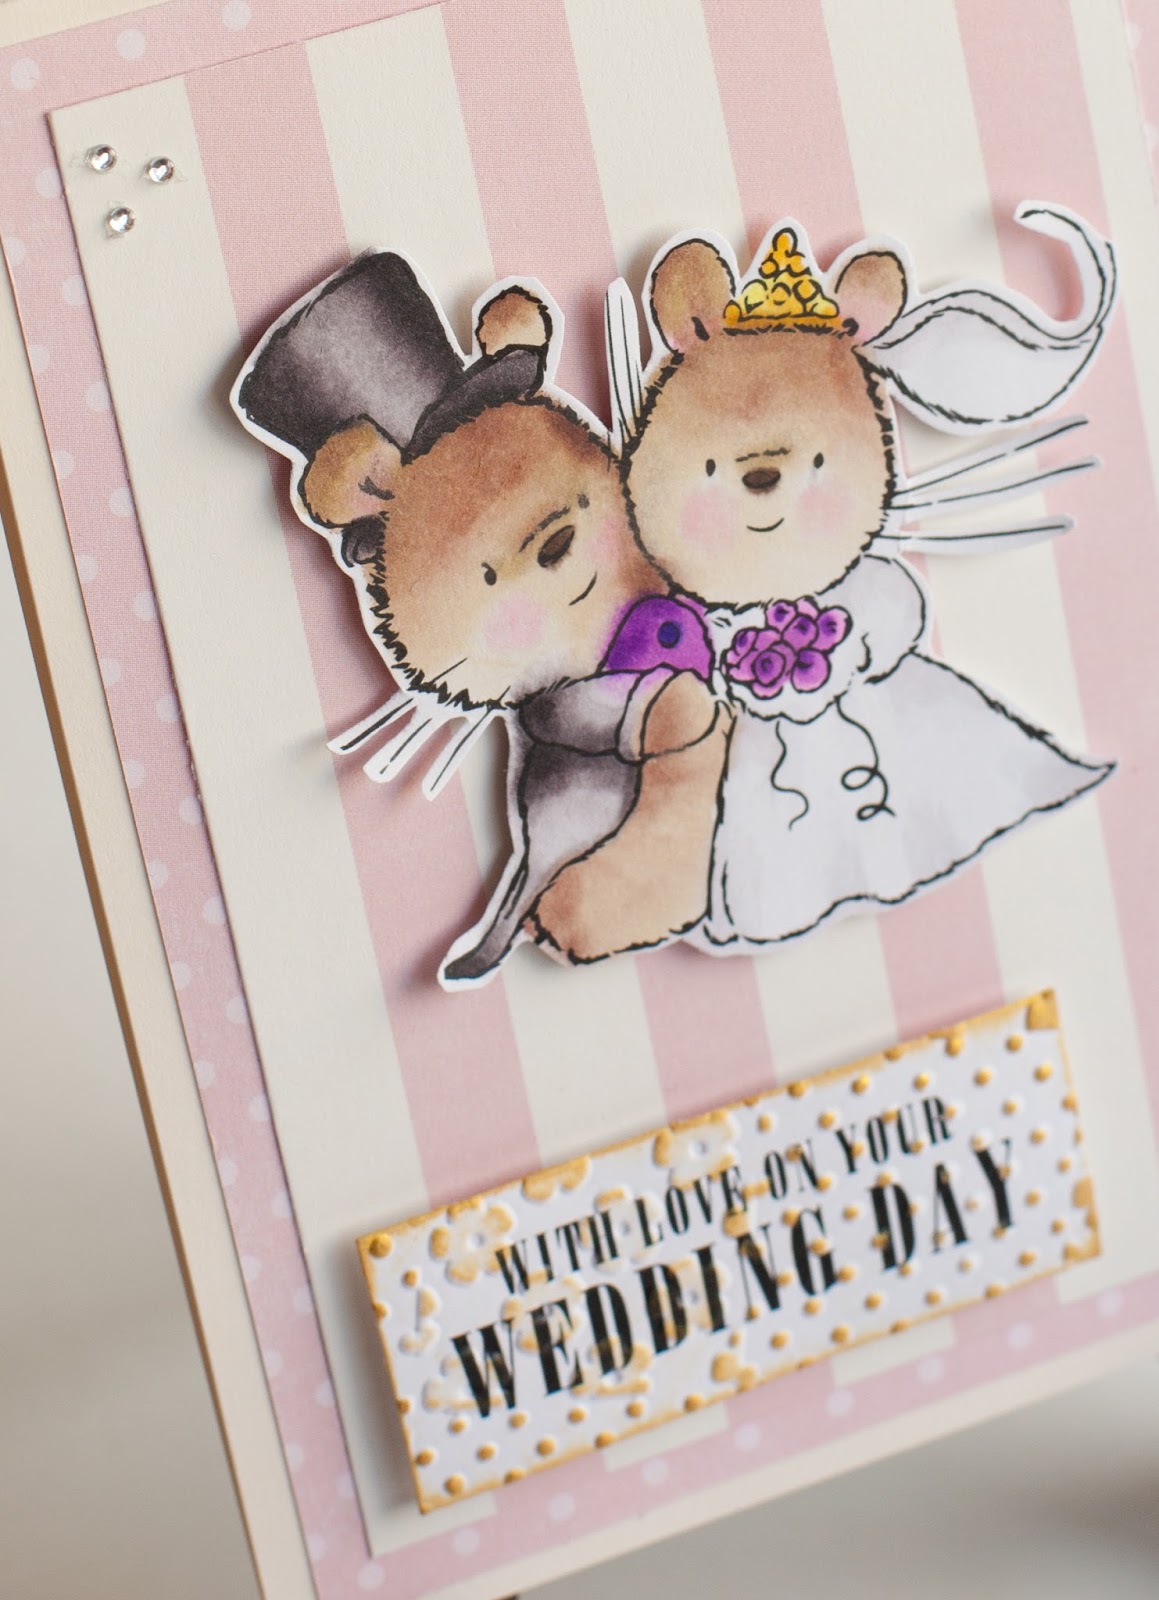
Friday, September 20, 2013

Makey Bakey Mice Release!


Good morning! Wait until you see these new sets for Makey Bakey Mice. ADORABLE beyond words. I used the Everday-Wedding Day set and one of the sentiments from this set. I colored them in with my Spectrum Noir markers (Spectrum Noirs: PL1, PL5, PP1, PP3, PP5, LV3, BG1, BG2, BG6, BG8, BG10, BT1, GB6, GB7, BT1, IG1, EB1, EB2, EB5, Blender Pen) and fussy cut around them.


I again pulled out some scraps for the backdrop of the mice and glued them down with pop dots to give dimension.

The sentiment was stamped with black ink and embossed with the Embossalicious folder, Patchwork Border. I then cut it down to size and dabbed on the Delicata ink pad in Golden Glitz (coming soon!). Also used pop dots to adhere this to the base. I added a couple clusters of rhinestones for shine.


Pop on over to Crafter's Companion today and see what other sets are available from Makey Bakey Mice!

Thursday, September 19, 2013

September Embossing Challenge


This month over at Crafter's Companion Challenge, the theme is EMBOSSING! Who doesn't love embossing? It's a totally easy way to add instant texture to your project. I love my embossing folders.

For my card, I actually used a couple embossing folders. For the pennants, I used the Darice 5x7 Chevron background (kraft pennant), 4.25x5.75 Flames (center pennant), and a harlequin embossing folder (black pennant).  This is a great way to use up your scraps, which is exactly what I did. I went digging and found some Halloween-ish looking papers and cut to various sizes, embossed, inked and snipped the ends freehand. I know a lot of people will use a square punch to get perfect pennants. I don't have one, so I just eyeball it! And it's quirky when they're perfect. :)


I glued them down to the card base, which I always use 4.25x5.5 cards, and then used some Halloween stickers at the top from Authentique (Enchanted Elements).

The jar image is from the Sheena A Little Bit Magical Honesty set. Amazing stuff here. I chose to make them into kind of creepy jars to fit the theme, using my Spectrum Noirs to color them (colors listed below) and I dabbed some Memento Luxe ink in Grey Flannel (coming soon!) on the jar labels and jars to make them appear antiqued even more. I also went over everything with Distress Ink in Old Paper, Tea Dye, and Scattered Straw dabbed on with craft sponges.

For the embossed pennants (flame and chevron), I dabbed on some Memento Ink in Tangelo and Lady Bug with the sponges as well.


I added a simple twine bow just because. As well as some spray mist flicked on for added "creep." Oh, and 3 tiny skulls with a punch I found for $1 at WalMart! Don't overlook the holiday sections of your local stores for little finds like that. I dabbed the Grey Flannel again on those to spook it up. BOO!

I hope you're inspired to grab those embossing folders and join our challenge this month on the blog!

Spectrum Noirs used: EB1, EB5, EB7, BG2, BG4, BGR1, BGR3, TN2, IG2, IG4, IG6, IG10, OR2, OR3, GB5, GB7, GB8, DG2, DG3, DG4, CT1, FS6, TN7, TN8, True Black and blender pen.

Monday, September 9, 2013

Christmas Delivery!


Hey there. I realize it's 90+ degrees outside here in Chicago and I'm posting a Christmas card, but hey, you have to stay ahead! This would be a cute card as a thank you to my mailman! With a little gift card slipped in there, what do you think?

I pulled out my trusty ol' scraps and went to town. I craft without a plan really. Sometimes I loosely use a sketch, but most of the time, I cut, glue and go. This was one of those.

I colored in my adorbs image from the Barkley Christmas Set-1st Class Christmas. The sentiment is also from that set as well. The whole Barkley line are so fun to color. I pulled out my Spectrum Noir markers and went to town. I used CG2, DG2, DR3, True Black, EB5, BT2, BG6, TB1, BG1, BG6, BGR1, BGR3, PP1, EB1, EB2, EB7, EB8, IG1, IG4, DR5, DR7, and the blender pen. I then diecut it out and used the Spray & Sparkle Glitter Varnish-Silver to coat the image in a fine mist of "snow." LOVE that stuff!!! I'm going to order the other colors as well. Just be sure to spray that outdoors on a non-windy day. :)


On the kraft piece, I used the bottom half of the embossing folder, Christmas Elegance, for just the snowflakes.

I took a photo on an angle to show you the glitter spray. LOVE this stuff.
I then just assembled it to how I liked it, added a little country-esque bow and there you have it! A simple and elegant holiday card perfect for the mailman, delivery driver if he frequents your place/business, or just anyone that needs a little smile during the holidays! These are great to have on hand just in case. Hope you enjoyed my card today.

Be sure to visit Crafter's Companion today for the above linked products as well as so much more. Shop away!


Saturday, September 7, 2013

Back to School!


It's that time of year again...back to school! So for back to school, I took a frame I have and made a custom little piece of art featuring a photo I took of my oldest son on his first day of school. 


For the base, I chose a yellow piece of cardstock in my stash. I then ran a sheet of the red cardstock through my Cuttblebug using the 4.25x5.75 embossing folder-ABC's from Crafter's Companion. The piece of red cardstock actually already had the notebook looking edge. I worked at a printing company where we would get swatch books for paper stock that was available, and when the books were replaced by new versions, or colors became obsolete, they either went to me or the trash. Guess who has a TON of scraps because of that?? This girl!

I then took another little scrap and made a simple pennant at the top right for some added interest. 

To complete the school look, I chose the stack of books from the latest set from Sheena called A Little Bit Magical-Knowledge. How perfect is that set name? These are seriously fun to color. I colored them in with my Spectrum Noir markers, using the blender pen, JG1, JG2, JG6, EB1, EB2, EB5, OR2, OR3, CT4, TB2, TB3, TB5, CR8, CG1, CG3, BG2, BG4, LV1, LV2, LV3, IG4, IG6, IG8, DG4,  PP3, BT5, BT7, BT9, GB6, and GB7. Phew!


I then used some letter stickers I had on hand to put 3rd, first day and the year on the book's spine. This way, I can take it out of the frame and scrapbook it and it's ready to glue down :) 


I hope you enjoyed my project and that it inspires you to whip up a cute framed photo of your child's first day. Happy school year.

Wednesday, August 28, 2013

Cat in the Hat Card


I bet you were thinking something else from the title, hmm? That was what I chose to call this card using the adorable cat in the hat image from Barkley Everyday-Be Fabulous. She's too cute. I colored her in using my Spectrum Noirs ( BG1, BG2, BG4, IG1, IG2, IG4, EB1, Blender, CR8, CR10, CR11, BG8, CT1, CT2, CT3, CT4 and TB2). 


After coloring her in, I cut her in a square shape and inked around the edges to soften that up with my Distress Ink in Scattered Straw. I did add some bling in two spots on the image to give it a little sparkle. I then used some adorable patterned paper (American Crafts, My Girl 6x6 Pad). 


For the sentiment, I actually used my fingertip to dab on the Distress Ink so it wasn't uniform and kind of splotchy. I really love the layout! So fun. Hope you check out all the great products available at Crafter's Companion.

Friday, August 23, 2013

Merry Christmas Pennant Card


Another holiday card for you! This one is a simple card based on a sketch I found on Pinterest. GREAT way to use up your scraps, too. Which, don't we all have a ton of, or is it just me?? 

Here's the card:


Basically, you want to just cut a thicker strip for the top and cut a bunch of various sized pennants and glue them to the back of the strip. Then adhere that to your card base. Add your sentiment, which I chose this one from the Sentimentals Mistletoe Kisses and just cut around it and used some foam adhesive dots behind it! I added some pearls and spray mist (flicked on/dotted on vs. sprayed on). Voila! These would be great cards to send out to a bunch of people if you could do them assembly line style!


Thanks for stopping by and check out all the great holiday items from Crafter's Companion today!

Tuesday, August 20, 2013

Dahlia Sympathy Card


I have a sympathy card today. Lately, I've needed quite a few of these. This is one of those types of cards we should always have on hand, just in case. I like to use flowers for these as I think they're a beautiful symbol that goes along with a warm thought or prayer for the recipient during a hard time. 


I chose the dahlia from the Sheena's A Little Bit Floral-Dahlia. I colored it in using my Spectrum Noir markers (CT1, CT2, CT3, CT4, and GB6). The sentiment is from Crisalis Classics-The Rehearsal which I just simply stamped on white, punched out with a circle punch and colored with the colors I used in the flower with the Spectrum Noirs.

I fussy cut the dahlia, quartered a doily, and used some perfect paper I had in my stash for behind the flower talking about family and the importance of it, and assembled it all. 


Thanks for visiting! Check out Crafter's Companion today!


Thursday, August 15, 2013

Crafter's Companion August Challenge: Animals


Welcome to the latest challenge for Crafter's Companion. This month's challenge is animals! There are a TON of great images I could have used. I wanted to do a holiday card this time, so I chose the set, Barkley Christmas-Friends and Family.

I stamped it, and colored it in using my Spectrum Noirs (EB1, EB2, BG4, TB1, TB3, TB5, BT1, PPI, IG2, IG6, IG1, IG8, DG2, JG1, JG2, CG3, DR5 and DR7.) I then just sponged around the outer edge after I cut around it with the Distress Ink, Old Paper.


The sentiment is from these AMAZING new sets called Sentimentals. This is from the Mistletoe Kisses set. Seriously. Get them ALL. They rock. You can buy them all here!!!

Behind the Barkley set, I used the 6x6 Embossalicious Embossing Folder, Christmas Elegance. I then just stuck some bling here and there in the centers of some of the snowflakes to add some interest.


Go play along with the Crafter's Companion challenge today!

Sunday, August 11, 2013

Happy Birthday, Man!


Hey there! Hope everyone had a great weekend. I have a manly birthday card here. I find that those are a challenge since most cards I find are not very manly! I love the way this came out. I dont' have a tutorial, but I'll explain how I achieved the ombre look. ;)

I knew I wanted a cool birthday card for a guy, so I chose the 4.25x5.75 Flames embossing folder from Crafter's Companion. What I did was use ink and a sponge to create the ombre flames. 


I cut out my white panel to emboss (4"x5-1/4") and I put that into the flame embossing folder and ran that through my Cuttlebug. I then took 3 ink pads and 3 sponges. I used Versamagic Thatched Straw (yellow), Memento Tangelo (orange), and Memento Lady Bug (red). 

What I did was I took the actual Thatched Straw ink pad since it's small, and lighter in color, and actually rubbed it over the embossed flame image. Just do that until it's the color you'd like. To build up the color and make a nice ombre look, I used the yellow about 2/3 of the way down the flame panel. This way, it builds up behind where you're putting your orange. 

Next, I took my Tangelo ink pad and rubbed my sponge onto that to pick up the ink. Then, I took my sponge with Tangelo and gently rubbed it over the paper/embossed image towards the bottom 2/3. You want to be darker down there since that's where it will fade into the red. Then as you use the ink you've picked up on the sponge, you can move your way up towards the yellow, using a gentle circular rubbing motion. It creates a soft transition from one color the next. 

Do the same with the Lady Bug ink pad with a different sponge and work your way up into the Tangelo color. Now you can go back and adjust wherever you need to add or blend your colors until it looks like you want it.


I used a few images from the Camden Town set, Male 2. Nothing goes better with flames than a racing flag and some tire marks! I kept it really simple using just black and white, no coloring, so the flame background stands out. 

Try out this technique today!

Saturday, July 27, 2013

Letters to Santa Mini Notebook


Sleigh bells ring...are you listening? In July? Suntan oil's glistening... ;) 

I've made a fun project today for your kids (and of course this can be adapted for shopping lists, holiday notes, or anything really) to write letters to Santa. Why just make one letter to the big guy in red? This would be a great keepsake to look at. 


I simply cut some notebook paper I tore out of one of my journals-I know, but it's for a good cause. Then I cut covers and glued some patterned holiday themed paper to them. 


I took some red textured cardstock and ran my new Christmas Ornament embossing folder from Crafter's Companion through my machine. I used some red rhinestones to the embossed circles for the ornament "string" at the top. I then used some letter stickers I had in my stash to write out letters to santa. 

Then I just punched two holes for a binding and used simple ribbon for it. You can use jump rings, brads, eyelets, anything you wish. 

And it's not Christmas without sparkles! I went to town spraying the front with my awesome Spray & Sparkle Glitter varnish. This spray is great for all sorts of projects and trust me, use it once, and you'll be hooked.


Lawn Fawnatics Challenge #8: Summertime Fun

  It's challenge time over at Lawn Fawnatics! This is challenge #8 which is summertime fun.  I mean, we are in the thick of summe...