Saturday, February 28, 2015

Bloom & Grow

I have one last card for this month to share with you. I used the Bebunni, Bloom & Grow set. I stamped it with Memento, Tuxedo Black on Ultra Smooth White Premium Cardstock. I colored it in with my Spectrum Noir Markers (CG1, CG2, BG1, BG3, BG4, Blender, FS4, FS6, FS9, IG2, EB2, EB3, EB8, LY2, GB4, GB6, GB8, BG9, FS6).


I fussy cut around the image, including the falling petals, but left a slight white border to add dimension once assembled. 

For the pink background, I used the Flora Bunda embossing folder with the Shimmering Cardstock in Pink Pearl. I rounded the two corners and adhered to my white card base. (Standard 4.25x5.5 card)

Behind the bunny, I created a little outdoorsy scene with two ink pads and a craft sponge! So simple. I used Memento, Summer Sky, Distress Ink in Scattered Straw and Memento Dew Drop in Tea Leaves.

I decided to glue that little scene to black patterned paper to make it really pop off the card. I then stuck the bunny and petals onto the scene with some foam adhesive. I love the way it gives such great dimension to a card! 

The little bow at the top of the flower stem was something I just made up as I went. I drew a bow shape on a piece of cardstock, cut it out and set that aside. I took a small piece of the Shimmering Cardstock in Yellow Pearl and ran through my machine using the Floral Stitch embossing folder. This gave the bow a little something. 

I then took my template I cut out, and placed it onto my embossed Yellow Pearl piece and cut that out and folded into the bow. I used a scrap piece of green paper for the center of the bow and glued together, and then finally glued to the flower stem. Isn't that a super cute touch?? And it was so simple. 


To give this card even more layers, I used an embossed tag from my stash and rubbed on some Memento Luxe in Grey Flannel. I used a bright green ribbon and clipped the ends and glued that down to the pink layer. I then glued down the bunny rectangle piece. 

For the sentiment, I used the Best Wishes from the same Bebunni, Bloom & Grow set, and diecut that out with the Die'Sire Scalloped Squares and snuck that behind the black piece. 

I hope you enjoyed my card today and that you swing on over to the Crafter's Companion website today to check out the products and samples!

Saturday, February 21, 2015

Bunches of Love


I'm back today with another Bebunni card!! This is from the set Bunches of Love. I stamped him with Tuxedo Black onto Ultra Smooth Premium White Cardstock.


I did a breakdown this time for the Spectrum Noir Marker colors I used for each section of the image to show you exactly where I used each color.


Bunny: IG1, IG3, IG4, BGR1, Blender
Ears: CR2, CR3, CR5
Nose: IG7
Cheeks: FS6
Tag: EB1, EB2, Blender
Flowers/Bouquet: BG4, GB6, GB7, BG1, BP2, BP5, CR6, CR8, LV1, LV2, OR1, OR2, GB5, GT1, GT2, FL3, CT2, CT4, TN4, TN8, DR2, DR7, CR1, FS4, FS9, JG1, JG3, CG3, CG4, CG1, BGR3, TB2, TB4

For the sentiment, I cut it out using the Die'Sire Essentials, Circles and behind that, I used the Die'Sire, Circle Doilies die. It adds a really pretty touch to the simple circle! I added a few light teal colored sequins for interest.

For the colored image, I fussy cut around him leaving a slight white area so it would pop off the background papers. I wanted a darker color behind him for that reason. I then used simple strips of grey patterned paper at the top and bottom of that darker piece. And for added pop, I chose to pull the orange from the bouquet for the card base. Now, this is a 6"x6" card, so it's larger than the cards I typically make and I love it! I finished it off with a simple orange hemp bow glued to the center of the bouquet.


I hope you enjoyed the project today! Check out the adorable Bebunni sets and more at Crafter's Companion. 

Wednesday, February 18, 2015

Birthday Blossom

Another Bebunni card is here for you today :) I cannot resist. She is just so adorable. I chose the Bebunni, Birthday Blossom set today for my card. It's just the perfect focal point for a card. I chose to leave the sentiment off this time just because it can be used for many different things that way!


I stamped her onto Ultra Smooth Premium White Cardstock in Tuxedo Black ink and colored her in with my Spectrum Noir Markers (BG2, BG4, BG10, BG5, CG1, BP1, BP7, FS2, FS6, HB2, HB3, LY2, TB8, CR1, FS4, GG1, TB1, Blender) and 057 of the Spectrum Noir Blendable Colored Pencils. I used that for the stems/leaves of the flowers since they're pretty thin and I didn't want the marker to bleed. That's a great tip ;)

I took 2 patterned papers and then some watercolor paper which I "colored" with Distress Ink in Pickled Raspberry after I cut them out using a scalloped bunting die. I then used some foam adhesive and tacked them down on the top of the card. 

I used just a plain kraft card base since I had some extra in my stash. Always great to use up your supplies!! 

I hope you enjoyed what I created today. Hop on over to Crafter's Companion to check out all the amazing goodies you can pick up there. 

Monday, February 16, 2015

Lawnscaping Challenge #100: Birthday Celebration

Good morning! Today is a special day at Lawnscaping because this is the 100th challenge!!!! Can I get a woot, woot?! So excited to be a part of this team. I had a lot of fun creating this card. Check out all the details on the Lawnscaping blog to participate. The challenge is birthday celebration. SO fun...


You'll want to because our amazing sponsor, Lawn Fawn, is giving away a great prize for this. LOVE me some Lawn Fawn, but then again, who doesn't??


AND there is something even more special to this challenge...we each invited someone to create a project as well! I chose the super talented (and amazing photographer) Latrice Murphy to play along with us! I'm so glad she accepted the invitation. Check out our projects below!

Be sure to check out the Lawnscaping Challenge blog where you can see ALL the Design Team projects as well as ALL of our special guest projects. You'll love all the inspiration, so grab a cup of whatever you please (always coffee for this girl!) and check everyone's amazing projects out today.

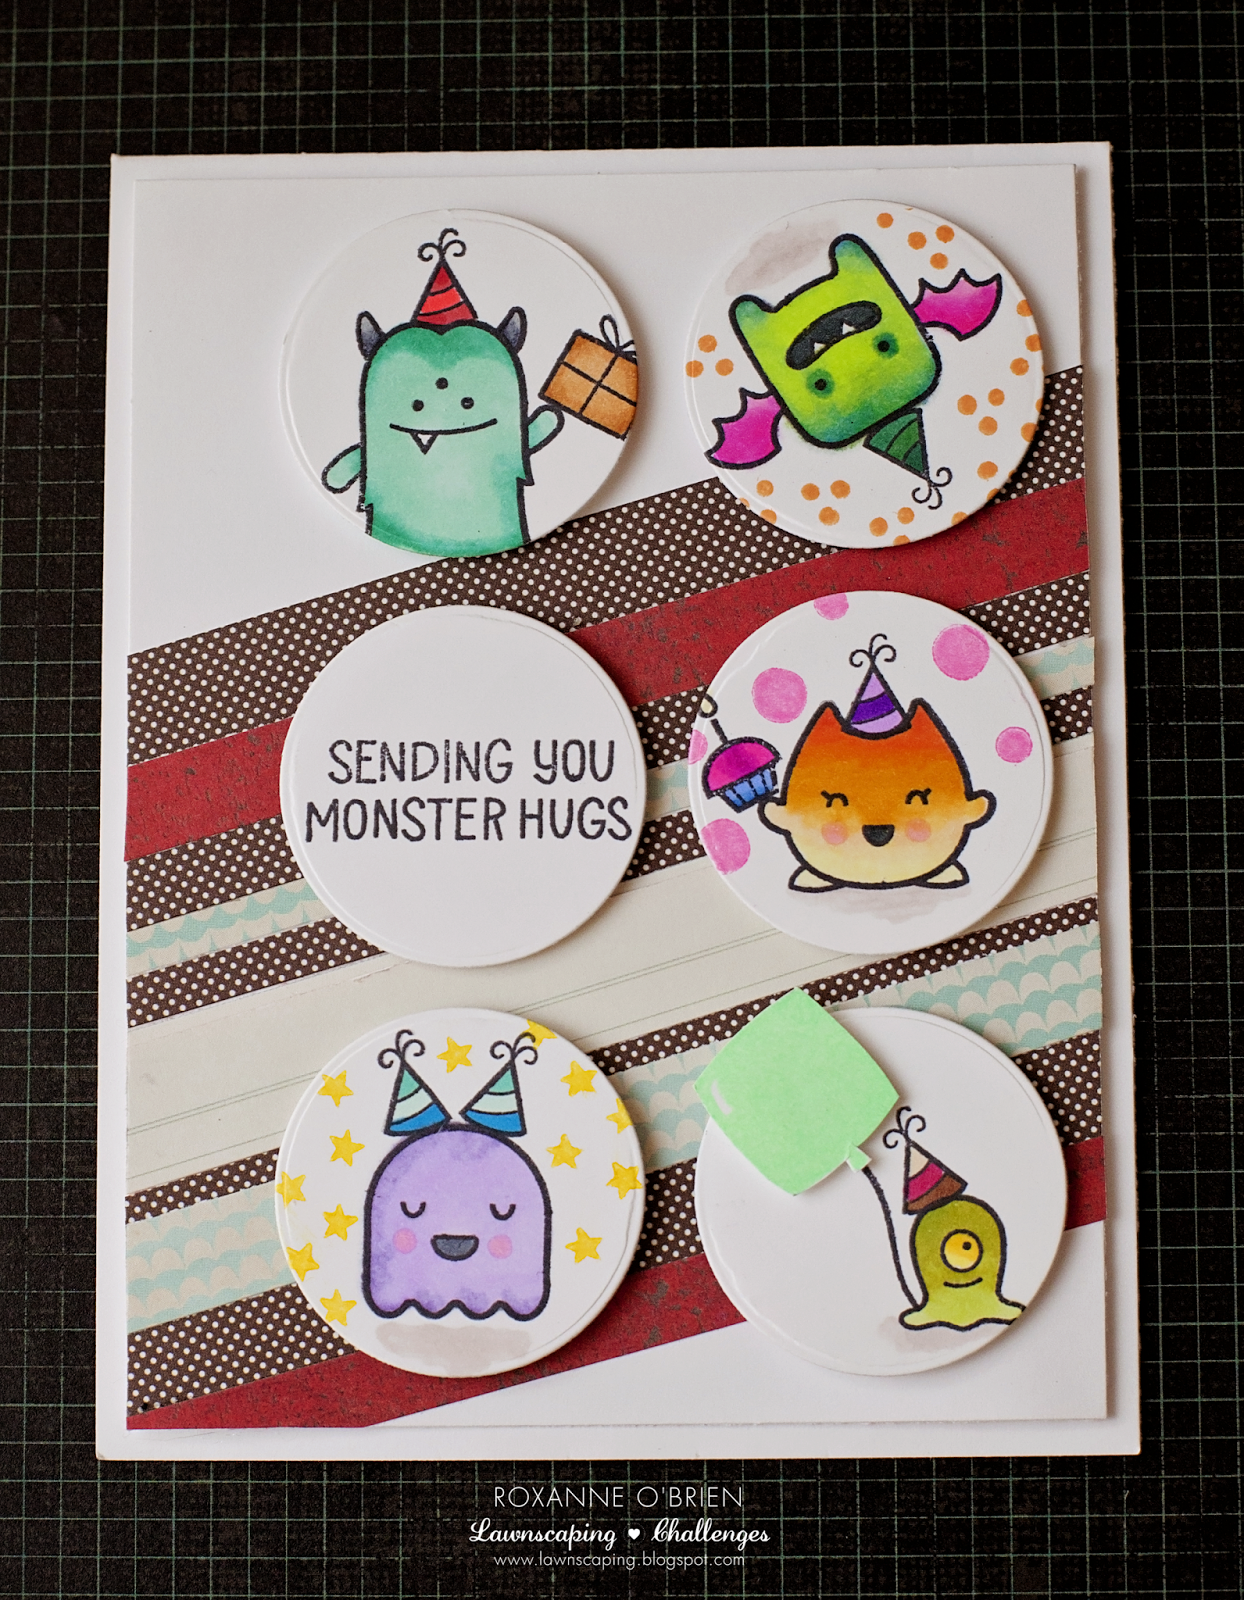
Here is the card I created for this challenge:


I found a similar layout on Pinterest (sorry, I can't recall which pin!) and went with it. For the card base, I chose a white card. Then I cut another white panel a little smaller and started playing with some paper in my stash and cut them at varying widths and glued them onto the white card piece in a diagonal. I had fun with that! 


For the circles, I cut out 6 circles in white and started stamping!! I used Memento in Tuxedo Black for all of the stamped images/sentiment. I used the Lawn Fawn Monster Mash for the monsters and I colored everything in with Spectrum Noir Markers. I used some fun little elements for each monster circle using Lawn Fawn Trim the Tree, Winter in the Park, Deck the Halls, and Beep Boop Birthday. 

I used Memento Luxe, Dandelion, Memento, Tangelo, and Radiant Neon inks in Electric Pink and Green for the little elements. 


I just love how this came out! So fun for a kiddo's birthday. 

Here is my special guests, Latrice Murphy, card she created for this challenge. Check out the details at her blog post! 

Big shout out to Latrice for accepting the challenge to play along today with our 100th challenge!! 


I hope you join us and play along with this Lawnscaping challenge.


Sunday, February 15, 2015

Sunshine and Smiles


I have one of my most favorite little characters here on the blog today - Bebunni. He/she is just so adorable, I cannot resist using these stamps.

For today's card, I used the Bebunni Floral, Flower Garden set. I love that the image is a little scene already before it's even colored.


I used my standard Memento in Tuxedo Black along with the Ultra Smooth Premium White Cardstock to start. I then grabbed my Spectrum Noir Markers (PP2, PP5, IG1, IG2, IG4, CG4, CR1, FS4, FS7, FS8, PL1, PL2, PL3, LY2, GB3, GB4, DR1, DR2, OR2, TN2, TN5, BT1, BT2, Blender) and started coloring. I love the spring time feel this has!! I really am anxious for spring around here. These temps are for the birds...

I then cut out the scene using a circle die and then a larger one was used for the patterned paper behind that. I used some foam adhesive behind the colored image to pop it off the patterned paper for dimension. 

The card base is yellow, but I wanted a slight pattern in the background, so I used a simple white polka dot on bright yellow paper. It pulled the color of the center of the flowers in, so that works! For the sentiment, I chose the "May your day be filled with sunshine and smiles" from the Flower Garden set. I used the Die'Sire Oval dies to cut that out. For a little pop of color and interest, I diecut some embossed tags I had in my stash with the Die'Sire Flowers for All Occasions die, and used Distress Inks in Seedless Preserves and Salty Ocean and blended those together. I snuck it behind the sentiment oval and pulled one petal forward. 


Here is a close up of the coloring (the background is slightly bluish, but is hard to capture that in photos, so in person, there is a bit more color than you see here):


HOP on over to Crafter's Companion today to check out all the new Bebunni images and everything else that's new!

Monday, February 2, 2015

Lawnscaping Challenge #99: Clean & Simple

Back again with another great challenge for Lawnscaping! Challenge #99's theme is clean & simple, white space is prominent. I love CAS (clean and simple) cards!! For this challenge, I made two cards and I'll show you why and explain how.


Our sponsor for this challenge is Ellen Hutson so be sure you check out the site because it's amazing! Who wouldn't want to win a gift certificate to shop fun supplies?! Exactly ;) Come and play along with us.

Like I had said above, I created two cards for this challenge. I'll show you one at a time, then both side by side further below.


The first card used a white card base and a simple panel cut a little smaller from a diagonal yellow striped sheet from the Lawn Fawn 6x6 Let's Polka Paper Pack. I used Lawn Fawn's Scripty Thanks Lawn Cut and cut it out of a sheet of shimmery yellow cardstock. I saved the diecut (HINT, HINT) and set it aside. Make sure you pull out the pieces from the "h", "k", "s" as you'll need to glue those in there. I stamped the bow from the Lawn Fawn Monster Mash set onto my Spectrum Noir Ultra Smooth White Cardstock and colored it in with Spectrum Noir Markers (CR10 and CR11) and cut it out, leaving a light white border around it. 


I adhered a piece of the striped yellow paper behind the thanks with foam adhesive, and then used foam adhesive again to adhere the yellow diecut thanks to the striped base. Carefully glue in the small pieces from the "h", "k" and "s" onto the striped sheet. I used foam adhesive to stick down the little pink bow. Totally CAS!


The second card used the positive that came from the diecut from the above card. I used a white card base again, and a stencil from Heidi Swapp (Dots) and some Heidi Swapp Color Shine in Mustard that I spritzed on. Let that dry and you can glue down your "thanks" with some foam adhesive. I then placed 3 turquoise sequins from Lawn Fawn, Fall, to give it a pop of color. Two cards, both CAS and easy to whip out! 


Here are the two card side by side!


I hope you enjoy this challenge and have fun with it! Remember, check out all the details on the blog and to link up to the challenge.


Saturday, January 31, 2015

Butterfly Memories


I have one of my favorite cards right here. Even my oldest was like, "Mom, this is so pretty!!" So right there told me I had a great card. 


For my base, I took a sage green textured cardstock and made my card and set that aside. From there, I chose a light green and ivory patterned paper. I've always seen other crafters stamp an image onto patterned paper, so I needed to try it. And I LOVE it. 

I took the bunch of flowers from the Stamp-It Australia Imagine, Floral Fancies set and inked it up with Memento Luxe in Rich Cocoa. I stamped it randomly on the paper. I love how it looks like real printed patterned paper. I'm definitely doing this again. 

I cut out my large butterfly with the Die'Sire Decorative Dies, Butterflies, from Shimmering Cardstock in Pearl Ivory. I rubbed on Memento Luxe in Angel Pink to make it a nice, soft pink. 

Behind the butterfly, I wanted pops of color, so I chose two coordinating papers and used my Die'Sire Essentials, Scalloped Squares to cut out two squares and I glued them down and then adhered my butterfly with foam adhesive circles to give it dimension.

The sentiment block was stamped with Staz-On Midi in Spiced Chai onto a square of the Pearl Ivory cardstock to match. I glued that to the center of the butterfly. I used the sentiment from the Sentimentals, Vintage set.

I encourage you to check out all the beautiful sets you could use to create your own custom patterned paper at Crafter's Companion.

Saturday, January 24, 2015

Hello...Love


I've got one of my favorite little guys today that I created a card with. I used my Bebunni, Sent With Love set. I inked him up with Memento in Tuxedo Black and stamped onto the Ultra Smooth Premium White Cardstock. I colored him in with my Spectrum Noir Markers (FS7, FS3, FS9, GG4, EB1, GB1, BG1, BG2, BG3, BGR1, BGR2, BGR3, PP3, and Blender) and cut him out. 


For the background, I used a dark grey textured cardstock and inked up the little envelope stamp from the Sent With Love set in Memento Luxe, Wedding Dress and stamped randomly to create the look of patterned paper. 


The tab on the left with hello... was diecut with the Die'Sire Essentials Just the Ticket dies. I inked it up with Memento Luxe in Grey Flannel and glued down to my newly created pattered paper. 

I used a cute little heart paper (which I now realized was upside down! Whoops!) diecut with a scalloped die that I have and I staggered the scallops and glued those down to my grey cardstock as well. 


I tacked down Mr. Bebunni with some foam adhesive and snuck in a fun embossed chipboard heart from my stash which I inked up with Memento in Rose Bud. I love this little card!!! 

Check out all the Bebunni sets (I need more of these!) at Crafter's Companion.

Thursday, January 22, 2015

Let's Toast!

Hi everyone, check out my cute little card today over on the Lawnscaping blog!! All the details are there!! Thanks for looking!


Monday, January 19, 2015

Lawnscaping Challenge #98 Sponsored by Lawn Fawn

Hi there! I'm here today with a card for our current Lawnscaping challenge. This is #98!! And it's a fun one - create your own background with stamps. I have to admit, this WAS a challenge but I'm so thrilled with the way mine came out. I hope you play along because there is a fab prize from the sponsor, Lawn Fawn, up for grabs.


Now, on to my project! 

For this card, I wanted to use the new set that I think is just too adorable, Lawn Fawn, Bugs & Kisses. For the background, I used the two hearts from the set and the swirl image and went to town creating a fun background. For the larger heart, I used Memento Luxe in Morocco. The smaller heart was stamped in Memento Luxe in Angel Pink, and the swirl is in Delicata, Golden Glitz. It's hard to capture the sparkle the gold gives to the paper, but it's really subtle and pretty!


I used a pink card base and cut my white panel a bit smaller to show that color on the left and right. For the top and bottom of the card, I chose the small hearts on pink from the Lawn Fawn 6x6 Let's Polka Paper Pack. I rounded just the bottom corners.

I took the two bugs and stamped them with Memento, Tuxedo Black onto my Spectrum Noir Ultra Smooth Coloring Cardstock, colored with my Spectrum Noir Markers, cut them out, setting their little bodies aside. I then stamped the same onto the actual background paper I created. This allows you to see their little legs and antennae, give dimension and not worry about having to cut out so close around the legs and antennae. I then just used some foam adhesive to pop up the bugs.


I added in the smaller heart stamped in Tuxedo Black and colored in with a gold Sharpie and used some foam adhesive. I love the little "love" between the two bugs. 

The sentiment "bugs & kisses" fit this perfectly and I just simply stamped it onto the heart paper at the bottom, making it flush right with the edge of the white cardstock. 

I gave the little girl bug and the "i" in kisses a bit of bling. 

I hope you join us in the challenge!!


Sunday, January 18, 2015

New Arrival


Good morning. I have a totally simple card today but perfect to give to someone who just had a baby, and it's perfect for either a boy or a girl. Love that aspect.


I used a simple cream cardstock base for my card. I then chose a light green textured cardstock and cut it so that a bit of the cream base peeks out at the bottom. For the brown borders, I used the Florabunda embossing folder and ran it through. This is a great layout to use up scraps in your stash! Just what I did.

For the center cream piece, I wanted some texture so I used a small piece of watercolor paper and grabbed the splatter stamp from the Stamp-It Australia Imagine, Ornate Accessories and inked it up with some Brilliance ink in Galaxy Gold and stamped two side by side splatters. I love the way it looks!

For the circle, I diecut a small circle that fits the "congratulations" circular text from the Sentimentals, Imagine set perfectly. I inked it up with Versamagic in Tea Leaves. You can choose a color close to the cardstock you're using for a subtle look. I took the "on your new arrival" sentiment and stamped that into the center with Memento Luxe in Rich Cocoa. I added four pearls to give it something fun.

I tied a twine bow (it has a bit of gold intertwined, so it's perfect with the gold splatters I stamped) around the splatter stamped piece and assembled it. Totally CAS and you could make this in a bunch of colors to have on hand for upcoming births of friends or family! I love having stashes of a variety of cards on hand. It's like shopping at my own store when I need a card. And they're handmade, even better!

Lawn Fawnatics Challenge #8: Summertime Fun

  It's challenge time over at Lawn Fawnatics! This is challenge #8 which is summertime fun.  I mean, we are in the thick of summe...