Saturday, June 20, 2015

Holly Jolly Christmas

I know, it's not nearly time to think about the holidays. But I wanted to make a card using holiday-themed items anyway! I was just in the mood to. But shhh, don't tell! Just pin the card and save it away for a rainy day this fall :)

I'll list out the steps below for the card I created and the links will be there for the products as well. Enjoy and fa-la-la-la-la-la-la-la.


1. Cut kraft cardstock base and score, and fold to 5.5x4.25. (Went landscape with this card due to the tag.)

2. Chose a holiday themed patterned paper and used a border die to give the edge a fun look. 

3. Adhere diecut holiday theme paper to base. Cut and glue a strip of dark brown cardstock above the diecut element. 

4. For my tag, I stamped the sentiment from Sentimentals, Mistletoe Kisses with Versamark and applied a white embossing powder over it. I then heat set the sentiment.

5. I stamped Distress Inks in Evergreen Bough, Festive Berries and Tea Dye onto an acrylic block and spritzed with water. I then pressed the tag onto the block and blotted off the excess color. 

6. For the spots of white you see, I used a white opaque paint flicked on. When it hits the distress ink, it spreads like melted snow :) 

7. I used a simple doily-like ribbon to tie through the tag's hole, and glued the tag to the base with foam adhesive.

8. The holly leaves are from the Stamp-It Australia Twinkle, Joy and Spirit set. I stamped that not Spectrum Aqua Watercolor Cardstock in Onyx Black/Versafine ink. I colored it in with my Spectrum Aqua Markers in Evergreen, Bud Green and Crimson and adhered with foam adhesive. 


And here is one more angle of the card to show the dimension. Check out Crafter's Companion for all your holiday (and non-holiday too!) project needs. SO much to choose from!!


Wednesday, June 17, 2015

With Love Lilies


Good morning! I have a really soft and soothing card today up that I actually created for a friend who is dealing with a loss in her life. I think sympathy cards should be just that - soft and soothing to look at. After all, any loss is difficult and little pretty card in the mail that makes you smile just a little when you open it is just what that person needs. 


I used the Sheena A Little Bit Floral Lily set today. I stamped it onto the Spectrum Aqua Watercolor Cardstock in Versafine ink in Onyx Black. I then started to color my lilies with Spectrum Aqua Markers in just four colors - Wildflower, Magenta and Blossom. I used Aquamarine around them to give them just a pop of soft color like the sky. 

For the sentiment, I also used the Watercolor Cardstock and the With Love from Me to You is from the Bebunni Floral, Sweet Friend set. I used a bit of the same Aquamarine to match and cut it into a pennant shape. I used a Gold Sharpie on the end of it to match the stamen inside the flowers I had colored as well. I used some foam adhesive behind it to pop it off the card. 


I chose a very subtle patterend paper to glue to my base and then rounded just one corner of my watercolored lilies panel and glued that down with the Extra Strong Permanent Tape Runner. I love using this with any watercoloring I do because even with thicker cardstock and adding water to it, it's going to warp it a bit. The strong adhesive definitely helps with making it nice and flat! This is one adhesive you don't want to be without. 

Monday, June 15, 2015

Lawnscaping Challenge 108: Stars and/or Stripes

Hi there! I'm back today with another fun challenge over at Lawnscaping Challenges. Today, here is our newest one...


Our sponsor for this challenge is none other than the amazing Lawn Fawn! 


Here is my take on the challenge!


I wanted to make a non-card project for this challenge. And I realized I don't have a lot of patriotic decorations, so my goal this summer is to create more of my own! It's more fun anyway :) This little piece will sit on the acrylic base on my china cabinet. 

For this, I took a piece of dark navy cardstock from my stash and cut it down. It's roughly 5x7. Then I took a piece of watercolor paper and used my Spectrum Aqua Markers on an acrylic block and applied water to the block. Then I pressed my watercolor paper onto the block. I love the look this gives!! 

I took the stars from the Lawn Fawn Trim the Tree and Hello Baby sets and used Brilliance Ink in Platinum Planet to stamp onto the watercolored background. It's subtle, but still gives a nice shimmer (in person). I did them in random places on the background. 


For the buntings, I diecut them out with my Die'Sire Classiques Traditional Bunting die out of white cardstock. I wanted them to have a fun patriotic feel, so I took the dotted lines from the Hello Baby set and the wavy line from the Beep Boop Birthday set and used Memento in Nautical Blue and Memento Luxe in Love Letter and stamped them. For the lighter blue lines, I used one of my Spectrum Noir Markers to draw that in. I wanted a little pop of color so I chose the Trim the Tree Lawn Cuts star die and cut out a handful from the 6x6 Let's Polka Petite Paper Pack. 

The sentiment was spelled out with Milo's ABC's in Memento Tuxedo Black stamped onto the watercolor background. I used some smaller letter stickers I had in my stash to spell out BRAVE for a pop of color. 

I glued my watercolor background paper to a piece of chipboard I had saved from packaging and I trimmed it down. I wanted to give it stability to stand up in the acrylic holder, so this really helped. 


I used foam adhesive to glue down the buntings and then I used the same to adhere the small die cut stars to the bunting as well. 

I hope you play along with our current challenge! Get patriotic! :)


Saturday, June 13, 2015

Lucky To Have You


Good morning! I have a fun little card here today to share with you. I'll list the products below. I've included several photos to show you all the details and coloring/shading.


1. Cut white cardstock to 4.25x11. Score at 5.5 and fold.

2. Gold paper is cut to 4x5.25 and the corners are rounded. Adhere with Crafter's Companion Extra Strong Permanent Tape Runner.

3. I used a patterened paper from my stash and used the Darice Embossing Folder, Flowers & Vines and ran through my machine. It gives it more texture! I also rounded the corners and adhered to the gold paper.

4. The image is the Bebunni Floral EZ Mount Stamp Set, Lucky You. I stamped it with Memento  in Tuxedo Black onto the White Ultra Smooth Premium Cardstock. I colored him in with my Spectrum Noir Markers in BG2, BG5, BG1, BG10, CR2, CR3, GB5, GB7, GB8, JG1, LG4, LG5, CT2, IG2 and Blender. I then cut him out and set aside.

5. The sentiment is also from the Lucky You set. I used the Die'Sire Essentials, Scalloped Circles to cut out the patterened scallop. I used the Die'Sire Essentials, Circles dies to cut out the sentiment and adhered that to the scalloped circle. I used some rhinestones for the swirled parts of the letters in the word LUCKY. I also used one in the center of the shamrock.

6. I used foam adhesive squares to adhere the sentiment circles and then Bebunni. I snuck his foot behind the sentiment.


I hope you enjoyed my card today! Please visit Crafter's Companion for more Bebunni sets and other amazing products!

Monday, June 1, 2015

Lawnscaping Challenge 107 - Calling All Critters sponsored by Ellen Hutson

Hi there! I have a cute card today to share with you for the new Lawnscaping Challenge. This challenge is CALLING ALL CRITTERS. There were so many critters in my stamp sets I had a hard time deciding which to use! I'll dive into the details in a minute, but let's get the challenge badge and challenge details and the prize up for grabs this time:


The fabulous Ellen Hutson is sponsoring this challenge with a $25 gift certificate to the online store!


Here is my take on the Calling All Critters challenge: 


I decided to use squirrels for my critters. They are actually from two different sets. I encourage everyone to look at their sets in different ways and showing you that you can definitely pair separate sets up together. The two squirrels are the same height, so this worked perfectly! I love that they have different facial expressions and different tails. 

The boy squirrel is from Lawn Fawn's Love You S'more set, and the girlie squirrel is from the Critters in Costume set. You'll recognize her from that set wearing wings and a halo! I just trimmed those off and you have a completely every day squirrel to use. I stamped them both onto watercolor cardstock with my Versafine ink in Onyx Black. I colored them in with my Spectrum Aqua Markers and a water brush pen. 

The heart between the squirrels is from the Lawn Fawn Woodgrain Backdrops. I stamped that onto white cardstock with Memento Luxe ink in Love Letter. I just cut out around it and left a little bit of white space. You can definitely use the coordinating dies for this set as well! 


I added the sentiment, i love you, from the Love You S'more set stamped onto kraft cardstock in Memento, Rich Cocoa. The die I used is from Die'Sire, Essentials, Just the Ticket. 

To make the squirrels pop off the card, I placed them on a fun background that I created using Versamark, clear embossing powder, and the woodgrain stamp from Woodgrain Backdrops. 

I scattered some wood veneer leaves from Lawn Fawn on the card to give it a pop of color. I simply colored them in with my Spectrum Aqua markers and my water brush pen.

For the white background, I used a Darice Dandelion embossing folder. I just cut the panel 1/4" smaller all the way around and glued to my white cardstock.


I hope you play along with our current challenge. Be sure to check the Lawnscaping Challenge blog for all the rules and details to enter and to leave your link! Happy crafting! 


Saturday, May 30, 2015

Monarch Birthday


Good morning! Summer is fast approaching and that always makes me think of butterflies. They're just gorgeous. Our local zoo has a special butterfly exhibit that I'm definitely going to be hitting up this summer to photograph. Hey, I'm a photographer, that's how I think! 


But for now, I've created a stunning card for a birthday using the Sheena, Monarch Butterfly stamp. I colored it in with my Spectrum Noir Markers in GB4, GB6, OR1, OR2, OR3, and DR1. I fussy cut that out and used a simple black card base. I used a large dot embossing folder to give that some interest. For the floral paper you see, I've had that FOREVER in my stash. It's a little spiral bound book of pretty diecut papers. I used that with the Toreads, Flora set for the sentiment. It's simple and perfect for this card. I then stuck down the butterfly with some foam adhesive and scattered some coordinating sequins around the card for some sparkle.


Perfectly summery and simple! Check out all the amazing Sheena sets to create stunning projects and more by Crafter's Companion!

Saturday, May 23, 2015

Party in a Teapot


Another Saturday project up on the blog today! This is a ton of fun and quite simple to create. Just a bit of coloring and drying time involved :)


For this card, I used a kraft card base. I then used a piece of shimmering Cardstock in Rose Pearl and the Dreamweaver Embossing Paste with a stencil I have and went to town. I used a heat gun to help it dry and then stuck it outside in the sun for a little bit (maybe 20 minutes). When it was dry, I laid the stencil back on top and used some Radiant Neon in Electric Yellow with a craft sponge and smeared that in some spots of the embossing paste. I love that it shows up, but isn't too heavy. Added just enough of the yellow to pull it out of my colored image. 

I tied a simple twine bow around the top in this beautiful pink lemonade color. I love it! 


For the colored image, I stamped the Moonbeam Meadow, Time for Tea with Versafine, Onyx Black onto my premium white cardstock. I then took my Spectrum Noir Blendable Colored Pencils (100, 96, 62, 63, 89, 84, 19, 22, 37, 34, 46, 45, 68, 71, 78, 80, 50, 103, 94, 17, 25) and colored it in. I used my Spectrum Noir Marker in IG2 to add in some dots on the teapot and some shading under the teapot and box. I used a simple white enamel dot and my Spectrum Noir Marker in DR5 to make a heart. I snuck that onto the tag of the teapot instead of using a sentiment. This way, I can use this card for various events!


Check out all the adorable Moonbeam Meadow sets Crafter's Companion has to offer and much more!

Monday, May 18, 2015

Lawnscaping Challenge #106: Try Something New!

Good morning! It's a new week, which means a new challenge from Lawnscaping. I must say this one was a challenge. I had a couple techniques that I'd been wanting to try and I ultimately decided on what I have here today - hand lettering!


Today's challenge is sponsored by the always amazing Lawn Fawn! 

These folks just rock and they have offered the winner a free stamp set of the winner's choice! So many stamps to choose from, I know. It's tough. 

I want it all!


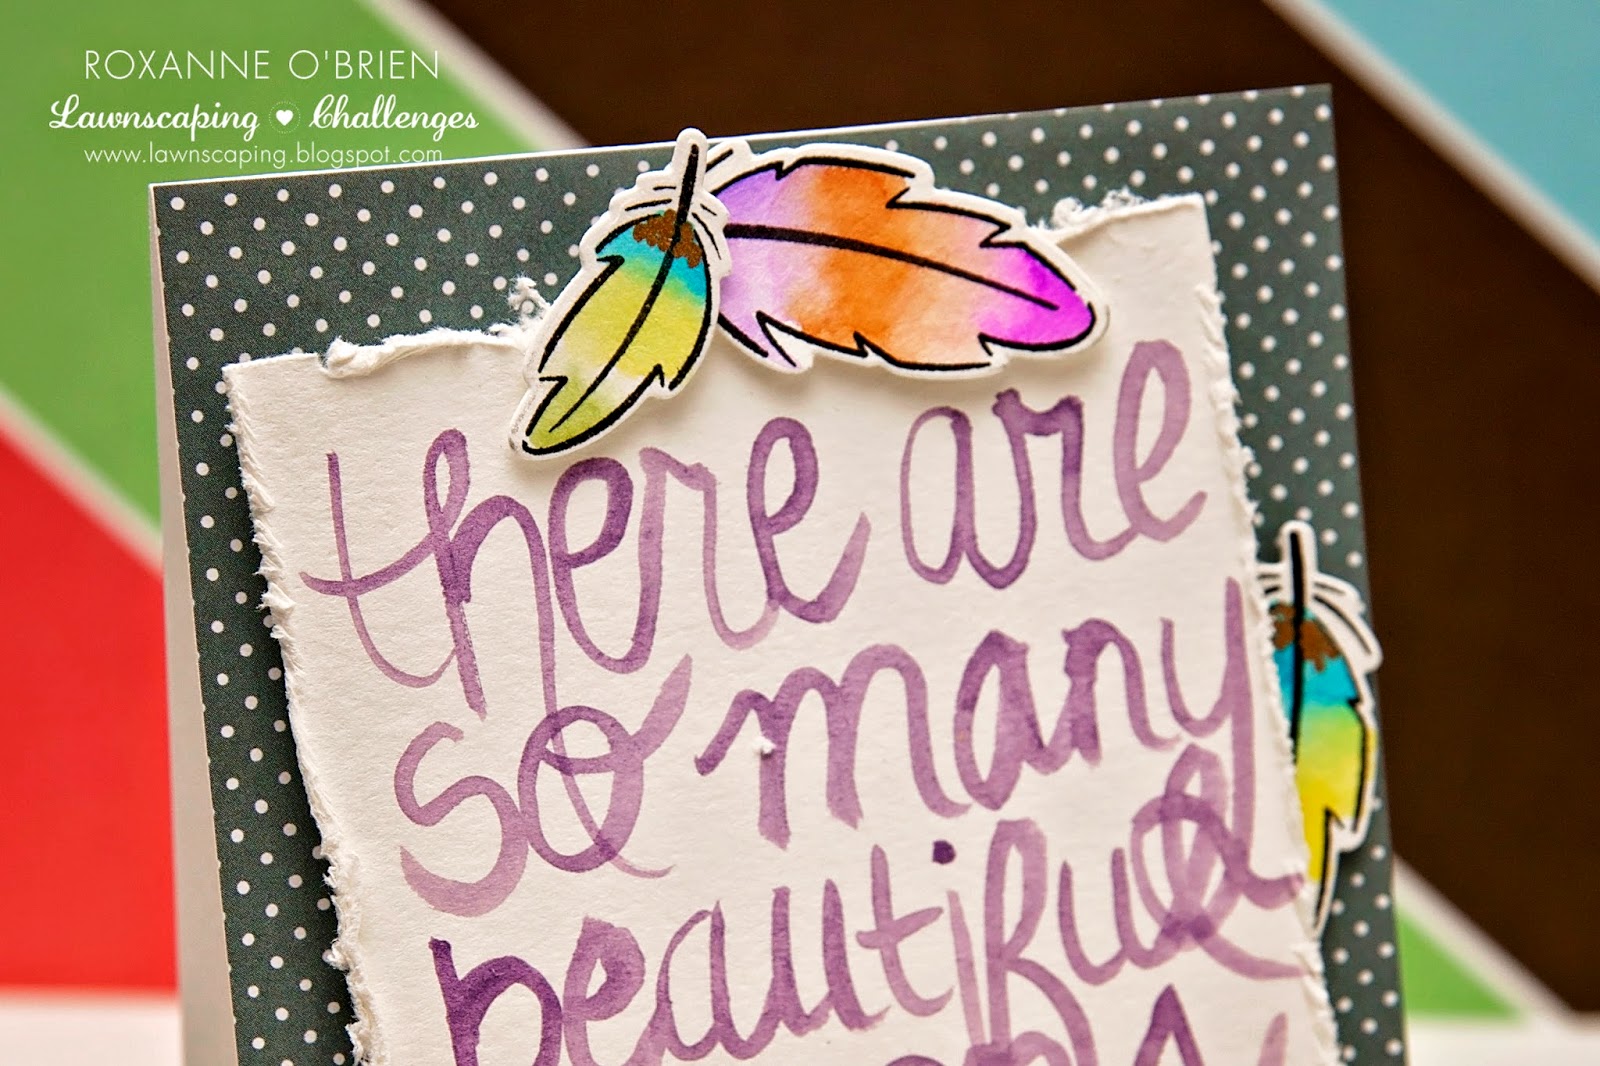
I love the look of hand lettering, and I decided to finally try it. I think I kinda like it. I will definitely try it again and I learned some things along this process. 

I love the feathers from the Lawn Fawn Dream set (with coordinating Lawn Cuts on this one). I used my Spectrum Aqua Markers to color them in after stamping and die cutting on watercolor paper. I use Versafine Ink in Onyx Black with my watercoloring. It's so nice and dark and it doesn't bleed/run. I love it. I cut out and colored a bunch of these. 


For the actual hand lettering, I just used some Memento Luxe Ink in Sweet Plum with a water brush pen. Here is where I learned some things - next time, I will purchase a good quality thin brush to letter with. But I love it anyway! I did do several of these before I ended up with one I thought worked for my liking! Practice makes perfect, right??

For the card, I used a simple white cardstock base. I cut a sheet of grey dotted paper from the Lawn Fawn 6x6 Let's Polka Petite Paper Pack and adhered that to my base. I cut it the same size this time (4.25x5.5). I then used foam adhesive to tack down my hand lettered quote. I did distress the edges of the piece for a little roughness to match the hand lettered look. I then took my colored feathers and tucked them in various places around the quote with some smaller foam adhesive. 

I hope you embrace something fun you've been wanting to try and enter the challenge!! 

Saturday, May 16, 2015

Anchored Thanks


Good morning! I wanted to create a simple, but masculine thank you card. I think these are the harder ones to create, for me anyway! But I love the way this came out, so I hope you'll be inspired to create a masculine card. Father's Day is coming up, so this would be a great card with the sentiment swapped out. Or even left as is, since you're in a way, thanking them for being a good father/grandfather/male role model!


 I wanted something clean and simple. I chose a simple white cardstock base (folded to 4.25x5.5). I took a piece of brighter yellow cardstock from my stash and went to work. This is a great way to use those scraps you might have lying around.

I took the Textures, Journal Jotting set and had some fun. I stamped the star inside the circle on the paper using Versamark and some clear embossing powder. I heat set that and started with my other stamping. I chose the water rings and stamped those with my Memento Nautical Blue ink, the arrows were stamped with Memento Luxe in Grey Flannel, and the lines were stamped with Distress Ink in Tea Dye. I just had fun layering the stamped images here and there, no rhyme or reason. 


For the brown cardstock, I grabbed that from my stash and used the Chevron embossing folder for some texture and cut that out with the Die'Sire Essentials Circle die (the largest one). For the sentiment, I took the paint splotches and stamped them with Radiant Neon in Electric Yellow and Memento Luxe in Grey Flannel (I stamped it off to remove most of the ink since I wanted it more subtle). The sentiment is from the Bebunni Bloom & Grow set and inked with Memento Nautical Blue again. I took a little wooden anchor piece I have on hand and used the Extra Strong Permanent Tape Runner to glue that to the circle. I snuck in a trimmed black and white striped pennant piece (just trimmed by hand) behind the circles. I chose to offset the sentiment circle image on the brown to show off the embossed texture of the chevron. 

I glued the yellow piece down on an angle on my card base, trimmed off the ends, and then glued down my circles, pennant piece and chose some fun navy blue enamel dots here and there to give the card even more interest. 

Check out Crafter's Companion for great products to create a similar card with a masculine feel!

Monday, May 4, 2015

Lawnscaping Challenge #105: Watercolors

Good morning! It's a new week, which means a new Lawnscaping Challenge. We are in May already. I'm very excited for the kids to be out of school, summer days, sun, and much more. It's been a LONG winter (I know that sounds silly, but when most of your year is cold, it's very much anticipated when it starts to get sunny and warm out) here!!


The wonderful, fabulous Ellen Hutson! is sponsoring this challenge!!! Certainly you are familiar with her and her store, but if not, a little bit about the store in her own words:

Ellen Hutson, LLC began their adventure in November 2006 as an online web store committed to bringing you the finest paper crafting products and related product education. They are always looking to provide their customers with quality products, excellent customer service, and education and inspiration for the products they carry. You can shop with Ellen by clicking HERE. As well please join them to be inspired and learn some fun techniques in the CLASSroom, or stay up-to-date on Facebook, YouTube, Instagram, Twitter, and/orPinterest.

Ellen Hutson will be sponsoring our first challenge of each month in 2015! The prize? 
A $25 gift certificate to the online store! Thank you Ellen!


Here is my take on the challenge:


I had a lot of fun with this card. I'm wanting to make some Mother's Day cards and I thought this was too cute. It's not a traditional card, but I love it!

I started with my card base in kraft. Simply scored, folded and rounded the bottom corners. 

Next, I took a piece of watercolor cardstock (I just use this pad you can get in the kid's craft aisle at Target; it's inexpensive and it works beautifully for all my projects that I use for watercolor), cut it to size and rounded the bottom corners to match my card base.

I pulled out my Lawn Fawn Love You A Latte set and the lightbulb went on. I took the Lawn Fawn Lawn Cuts, Circle Stackables and I used my Chestnut Spectrum Aqua Marker to color on an acrylic block. I then spritzed it with water to make it into my watercolor paint! Then I used the cut side of the die and pressed it down into the watercolor paint I created on my block. I then used it as a stamp to create the "coffee stains" you see on the card. I made two circles, and then just simply used a paper towel laid over the top and I pressed gently to pick up the extra watercolor paint. I flicked on some Mister Huey's Warm Calico, used a little embossing powder and a heat gun to dry it. I love the way that came out! I took the little coffee bean stamp from the Love You A Latte set and inked it up with some Distress Ink in Tea Dye and randomly stamped that onto the background. I cut a simple strip from the Lawn Fawn Snow Day 6x6 Petite Paper Pack and glued that to the top of the piece. I glued that all to my card base.  
I created a little tag for my sentiment using the Lawn Fawn Tag, You're It Lawn Cuts. I stamped the "love you a latte" onto the tag with Memento in Rich Cocoa and added a little red heart from the same set using Memento Luxe in Love Letter. I adhered that to my card with some foam adhesive. 

Since the card is coffee themed, you have to have a cup of coffee and a little tasty treat to accompany it, right? I used these items from the same Love You A Latte set. I stamped the cup and donut onto the same watercolor stock using Versafine in Onyx Black and cut them out. The plate was stamped onto a scrap of paper from my Lawn Fawn Sweater Weather 6x6 Petite Paper Pack. I colored the cup and donut with my Spectrum Aqua Markers and water brush pen. I added the steam coming from the cup using Memento Luxe in Grey Flannel; it's stamped onto the actual card and then on the top of the cup and I lined them up when I adhered it down with foam adhesive.

One final look at the details on the card: 


I hope you play along with this challenge. It's so much fun! You can use so many different items for the watercolor look, crayons, and more! 

Don't forget to keep checking our Facebook page, where our Facebook Inspiration Team will be sharing projects throughout the challenge!

Saturday, May 2, 2015

For Someone So Special


Happy May! Since Mother's Day is fast approaching, I wanted to share a card I made for one of the special ladies' in my life. I used the Moonbeam Meadow, Love Birds set for my main image. I diecut a circle out of watercolor stock using the Die'Sire Essentials, Circles dies. I colored the image in with my Spectrum Aqua Markers using Begonia, Desert, Terra Cotta, Heather, Sunflower, Fawn, Kingfisher, Navy, Bud Green, Peach, Marigold, Sunset, Slate, Blossom, Sea Green, Chocolate, and Aquamarine and my trusty water brush pen. I just swipe the larger end of the marker onto an acrylic block and pick up the color with my water brush pen and start coloring. These are by far my absolute favorite item to grab to color an image in. 


For the sentiment, I used the Die'sire Essentials, Scalloped Squares with a piece of navy cardstock. I stamped the "For Someone So Special" from the Bebunni Floral, Bloom & Grow set with Memento Luxe in Wedding Dress and used some white embossing powder and a heat gun to really make the wording pop. 
I glued the sentiment square to the diecut circle image and added three pearls for something fun. I wanted to make this really shine by adding some subtle texture and color to the background. I used a piece of Shimmering Cardstock in Yellow Pearl with my Blooming Wonderful embossing folder. I rounded all the corners to soften it up and used foam adhesive to glue to my white card base. I then also used more foam adhesive to blue my image and sentiment to the embossed panel. 


I hope you were inspired to create some Mother's Day cards for those special women in your life. Brighten someone's day with a handmade card. It really makes the recipient feel special! Happy Saturday! 

Come on over to Crafter's Companion to see all the wonderful items you can purchase for your card making needs. They truly have it all!

Lawn Fawnatics Challenge #8: Summertime Fun

  It's challenge time over at Lawn Fawnatics! This is challenge #8 which is summertime fun.  I mean, we are in the thick of summe...