Saturday, May 23, 2015

Party in a Teapot


Another Saturday project up on the blog today! This is a ton of fun and quite simple to create. Just a bit of coloring and drying time involved :)


For this card, I used a kraft card base. I then used a piece of shimmering Cardstock in Rose Pearl and the Dreamweaver Embossing Paste with a stencil I have and went to town. I used a heat gun to help it dry and then stuck it outside in the sun for a little bit (maybe 20 minutes). When it was dry, I laid the stencil back on top and used some Radiant Neon in Electric Yellow with a craft sponge and smeared that in some spots of the embossing paste. I love that it shows up, but isn't too heavy. Added just enough of the yellow to pull it out of my colored image. 

I tied a simple twine bow around the top in this beautiful pink lemonade color. I love it! 


For the colored image, I stamped the Moonbeam Meadow, Time for Tea with Versafine, Onyx Black onto my premium white cardstock. I then took my Spectrum Noir Blendable Colored Pencils (100, 96, 62, 63, 89, 84, 19, 22, 37, 34, 46, 45, 68, 71, 78, 80, 50, 103, 94, 17, 25) and colored it in. I used my Spectrum Noir Marker in IG2 to add in some dots on the teapot and some shading under the teapot and box. I used a simple white enamel dot and my Spectrum Noir Marker in DR5 to make a heart. I snuck that onto the tag of the teapot instead of using a sentiment. This way, I can use this card for various events!


Check out all the adorable Moonbeam Meadow sets Crafter's Companion has to offer and much more!

Monday, May 18, 2015

Lawnscaping Challenge #106: Try Something New!

Good morning! It's a new week, which means a new challenge from Lawnscaping. I must say this one was a challenge. I had a couple techniques that I'd been wanting to try and I ultimately decided on what I have here today - hand lettering!


Today's challenge is sponsored by the always amazing Lawn Fawn! 

These folks just rock and they have offered the winner a free stamp set of the winner's choice! So many stamps to choose from, I know. It's tough. 

I want it all!


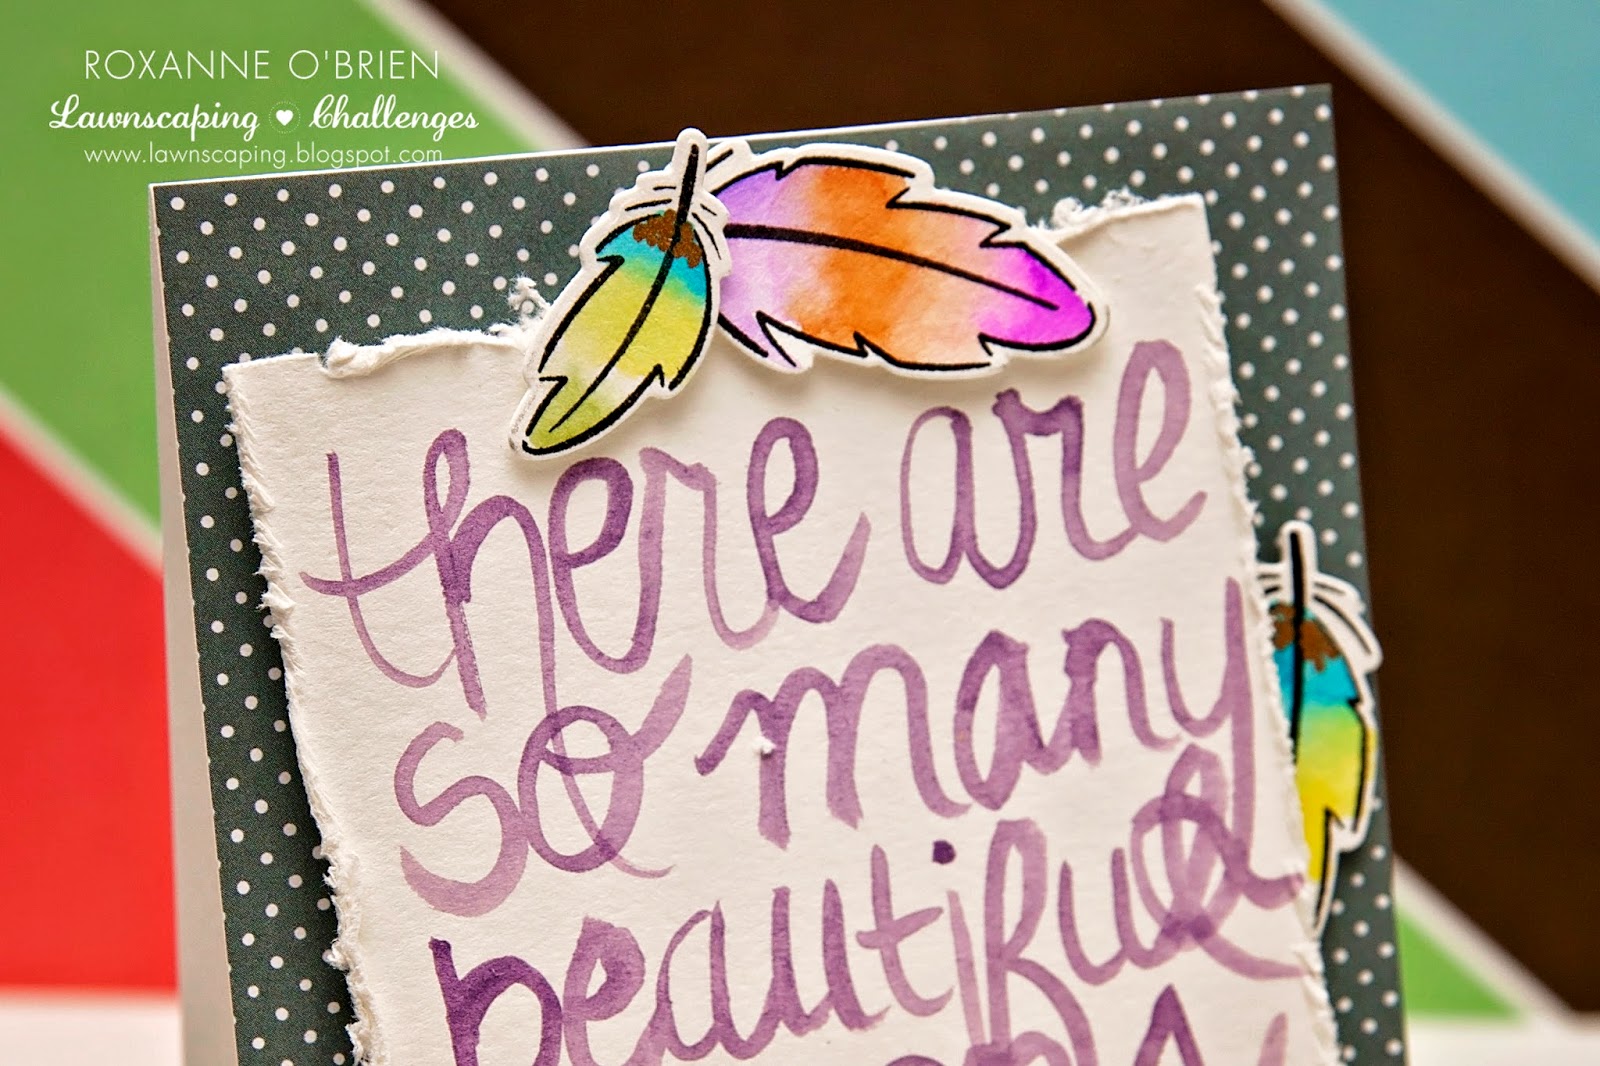
I love the look of hand lettering, and I decided to finally try it. I think I kinda like it. I will definitely try it again and I learned some things along this process. 

I love the feathers from the Lawn Fawn Dream set (with coordinating Lawn Cuts on this one). I used my Spectrum Aqua Markers to color them in after stamping and die cutting on watercolor paper. I use Versafine Ink in Onyx Black with my watercoloring. It's so nice and dark and it doesn't bleed/run. I love it. I cut out and colored a bunch of these. 


For the actual hand lettering, I just used some Memento Luxe Ink in Sweet Plum with a water brush pen. Here is where I learned some things - next time, I will purchase a good quality thin brush to letter with. But I love it anyway! I did do several of these before I ended up with one I thought worked for my liking! Practice makes perfect, right??

For the card, I used a simple white cardstock base. I cut a sheet of grey dotted paper from the Lawn Fawn 6x6 Let's Polka Petite Paper Pack and adhered that to my base. I cut it the same size this time (4.25x5.5). I then used foam adhesive to tack down my hand lettered quote. I did distress the edges of the piece for a little roughness to match the hand lettered look. I then took my colored feathers and tucked them in various places around the quote with some smaller foam adhesive. 

I hope you embrace something fun you've been wanting to try and enter the challenge!! 

Saturday, May 16, 2015

Anchored Thanks


Good morning! I wanted to create a simple, but masculine thank you card. I think these are the harder ones to create, for me anyway! But I love the way this came out, so I hope you'll be inspired to create a masculine card. Father's Day is coming up, so this would be a great card with the sentiment swapped out. Or even left as is, since you're in a way, thanking them for being a good father/grandfather/male role model!


 I wanted something clean and simple. I chose a simple white cardstock base (folded to 4.25x5.5). I took a piece of brighter yellow cardstock from my stash and went to work. This is a great way to use those scraps you might have lying around.

I took the Textures, Journal Jotting set and had some fun. I stamped the star inside the circle on the paper using Versamark and some clear embossing powder. I heat set that and started with my other stamping. I chose the water rings and stamped those with my Memento Nautical Blue ink, the arrows were stamped with Memento Luxe in Grey Flannel, and the lines were stamped with Distress Ink in Tea Dye. I just had fun layering the stamped images here and there, no rhyme or reason. 


For the brown cardstock, I grabbed that from my stash and used the Chevron embossing folder for some texture and cut that out with the Die'Sire Essentials Circle die (the largest one). For the sentiment, I took the paint splotches and stamped them with Radiant Neon in Electric Yellow and Memento Luxe in Grey Flannel (I stamped it off to remove most of the ink since I wanted it more subtle). The sentiment is from the Bebunni Bloom & Grow set and inked with Memento Nautical Blue again. I took a little wooden anchor piece I have on hand and used the Extra Strong Permanent Tape Runner to glue that to the circle. I snuck in a trimmed black and white striped pennant piece (just trimmed by hand) behind the circles. I chose to offset the sentiment circle image on the brown to show off the embossed texture of the chevron. 

I glued the yellow piece down on an angle on my card base, trimmed off the ends, and then glued down my circles, pennant piece and chose some fun navy blue enamel dots here and there to give the card even more interest. 

Check out Crafter's Companion for great products to create a similar card with a masculine feel!

Monday, May 4, 2015

Lawnscaping Challenge #105: Watercolors

Good morning! It's a new week, which means a new Lawnscaping Challenge. We are in May already. I'm very excited for the kids to be out of school, summer days, sun, and much more. It's been a LONG winter (I know that sounds silly, but when most of your year is cold, it's very much anticipated when it starts to get sunny and warm out) here!!


The wonderful, fabulous Ellen Hutson! is sponsoring this challenge!!! Certainly you are familiar with her and her store, but if not, a little bit about the store in her own words:

Ellen Hutson, LLC began their adventure in November 2006 as an online web store committed to bringing you the finest paper crafting products and related product education. They are always looking to provide their customers with quality products, excellent customer service, and education and inspiration for the products they carry. You can shop with Ellen by clicking HERE. As well please join them to be inspired and learn some fun techniques in the CLASSroom, or stay up-to-date on Facebook, YouTube, Instagram, Twitter, and/orPinterest.

Ellen Hutson will be sponsoring our first challenge of each month in 2015! The prize? 
A $25 gift certificate to the online store! Thank you Ellen!


Here is my take on the challenge:


I had a lot of fun with this card. I'm wanting to make some Mother's Day cards and I thought this was too cute. It's not a traditional card, but I love it!

I started with my card base in kraft. Simply scored, folded and rounded the bottom corners. 

Next, I took a piece of watercolor cardstock (I just use this pad you can get in the kid's craft aisle at Target; it's inexpensive and it works beautifully for all my projects that I use for watercolor), cut it to size and rounded the bottom corners to match my card base.

I pulled out my Lawn Fawn Love You A Latte set and the lightbulb went on. I took the Lawn Fawn Lawn Cuts, Circle Stackables and I used my Chestnut Spectrum Aqua Marker to color on an acrylic block. I then spritzed it with water to make it into my watercolor paint! Then I used the cut side of the die and pressed it down into the watercolor paint I created on my block. I then used it as a stamp to create the "coffee stains" you see on the card. I made two circles, and then just simply used a paper towel laid over the top and I pressed gently to pick up the extra watercolor paint. I flicked on some Mister Huey's Warm Calico, used a little embossing powder and a heat gun to dry it. I love the way that came out! I took the little coffee bean stamp from the Love You A Latte set and inked it up with some Distress Ink in Tea Dye and randomly stamped that onto the background. I cut a simple strip from the Lawn Fawn Snow Day 6x6 Petite Paper Pack and glued that to the top of the piece. I glued that all to my card base.  
I created a little tag for my sentiment using the Lawn Fawn Tag, You're It Lawn Cuts. I stamped the "love you a latte" onto the tag with Memento in Rich Cocoa and added a little red heart from the same set using Memento Luxe in Love Letter. I adhered that to my card with some foam adhesive. 

Since the card is coffee themed, you have to have a cup of coffee and a little tasty treat to accompany it, right? I used these items from the same Love You A Latte set. I stamped the cup and donut onto the same watercolor stock using Versafine in Onyx Black and cut them out. The plate was stamped onto a scrap of paper from my Lawn Fawn Sweater Weather 6x6 Petite Paper Pack. I colored the cup and donut with my Spectrum Aqua Markers and water brush pen. I added the steam coming from the cup using Memento Luxe in Grey Flannel; it's stamped onto the actual card and then on the top of the cup and I lined them up when I adhered it down with foam adhesive.

One final look at the details on the card: 


I hope you play along with this challenge. It's so much fun! You can use so many different items for the watercolor look, crayons, and more! 

Don't forget to keep checking our Facebook page, where our Facebook Inspiration Team will be sharing projects throughout the challenge!

Saturday, May 2, 2015

For Someone So Special


Happy May! Since Mother's Day is fast approaching, I wanted to share a card I made for one of the special ladies' in my life. I used the Moonbeam Meadow, Love Birds set for my main image. I diecut a circle out of watercolor stock using the Die'Sire Essentials, Circles dies. I colored the image in with my Spectrum Aqua Markers using Begonia, Desert, Terra Cotta, Heather, Sunflower, Fawn, Kingfisher, Navy, Bud Green, Peach, Marigold, Sunset, Slate, Blossom, Sea Green, Chocolate, and Aquamarine and my trusty water brush pen. I just swipe the larger end of the marker onto an acrylic block and pick up the color with my water brush pen and start coloring. These are by far my absolute favorite item to grab to color an image in. 


For the sentiment, I used the Die'sire Essentials, Scalloped Squares with a piece of navy cardstock. I stamped the "For Someone So Special" from the Bebunni Floral, Bloom & Grow set with Memento Luxe in Wedding Dress and used some white embossing powder and a heat gun to really make the wording pop. 
I glued the sentiment square to the diecut circle image and added three pearls for something fun. I wanted to make this really shine by adding some subtle texture and color to the background. I used a piece of Shimmering Cardstock in Yellow Pearl with my Blooming Wonderful embossing folder. I rounded all the corners to soften it up and used foam adhesive to glue to my white card base. I then also used more foam adhesive to blue my image and sentiment to the embossed panel. 


I hope you were inspired to create some Mother's Day cards for those special women in your life. Brighten someone's day with a handmade card. It really makes the recipient feel special! Happy Saturday! 

Come on over to Crafter's Companion to see all the wonderful items you can purchase for your card making needs. They truly have it all!

Saturday, April 25, 2015

Beautiful Hydrangeas


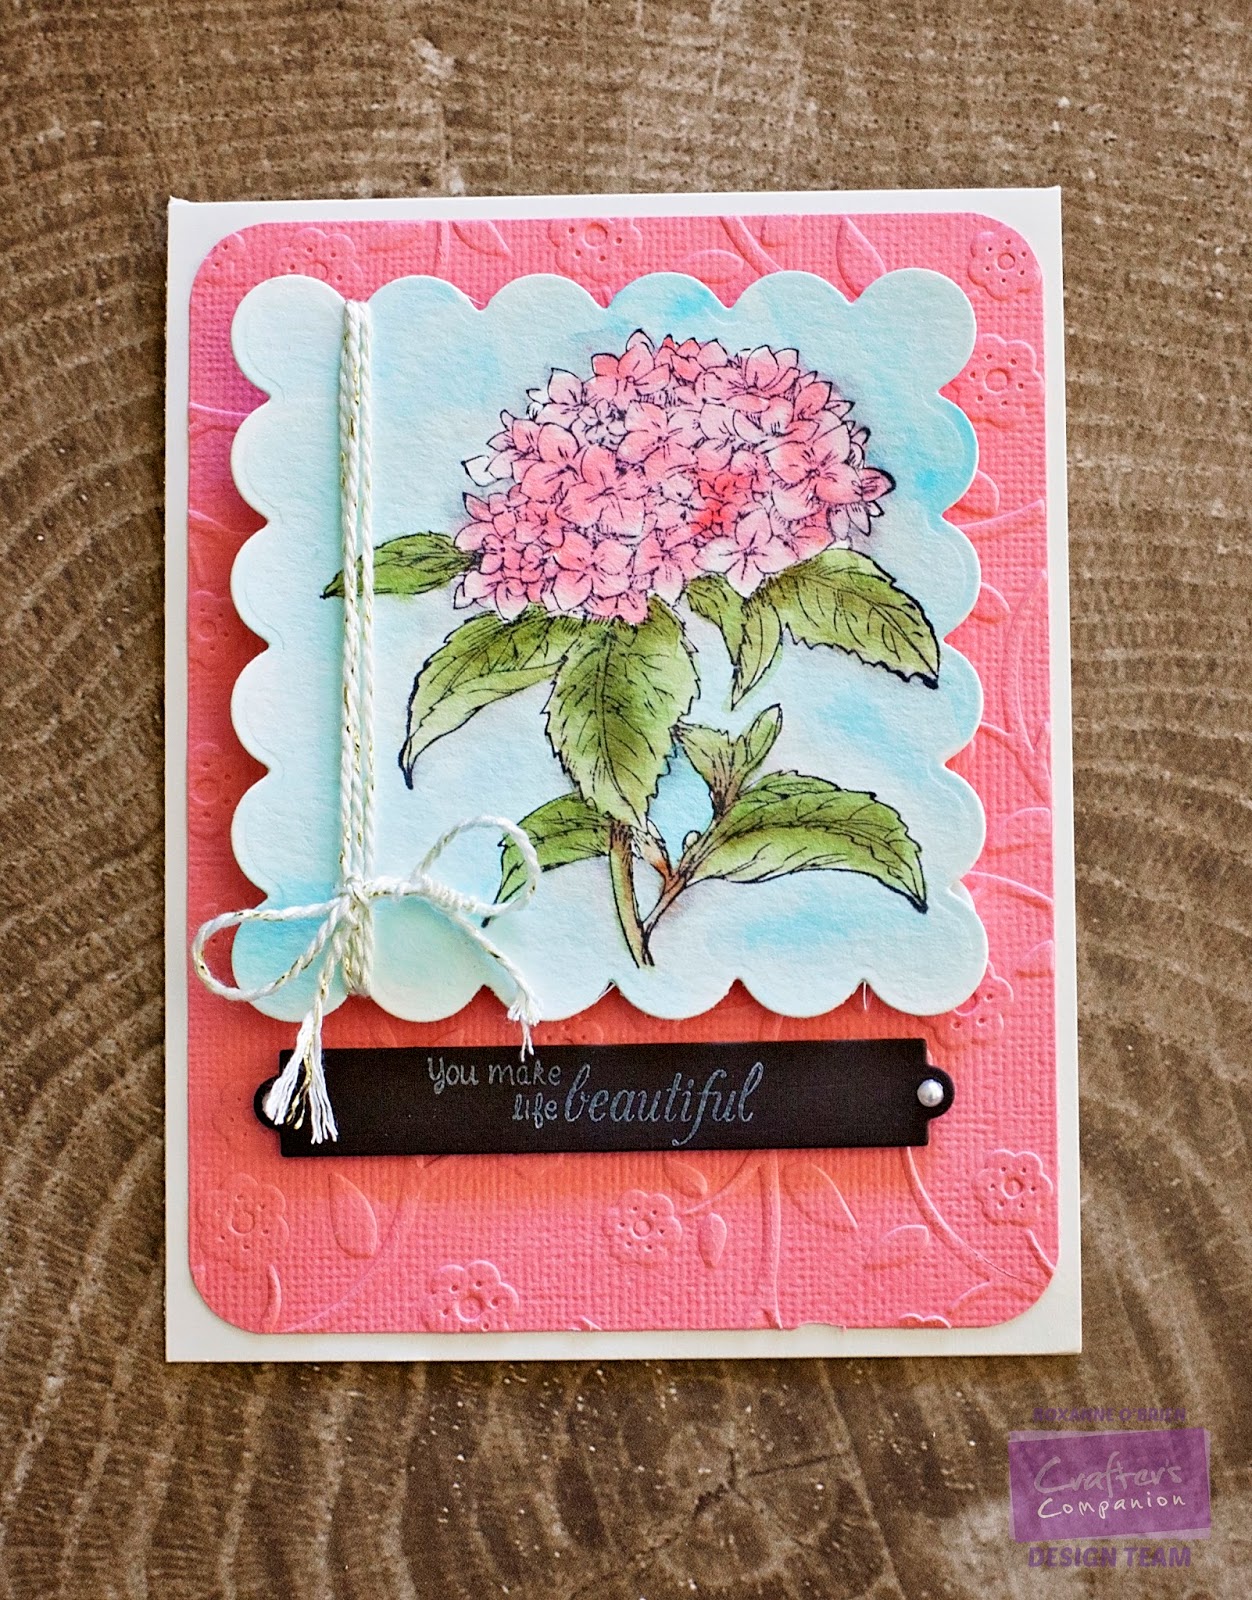
Nothing says spring like flowers to me. I chose the hydrangea image from the Stamp-It Australia, Floral Fancies set. I diecut the watercolor paper using my Die'Sire Essentials, Scalloped Squares die (the largest one) and stamped the image onto it, moving it flush right, with Memento, Tuxedo Black. I then colored it in using Spectrum Aqua Watercolor Markers in Aquamarine (background), Moss, Leaf Green, Chocolate, Blossom, Begonia and Slate (shadowing). 


I used some pretty white/gold twine in my stash and tied it around the left side of the diecut square.
For the pink background, I used a color that coordinated with the hydrangeas I colored, and used the Flowers & Vines embossing folder. I then rounded the corners and adhered to my card base. I then used foam adhesive to glue the hydrangea square to the pink embossed background. 


The sentiment is from the Bebunni Floral Collection, Flower Garden. It's just a pretty and soft font! I used Memento Luxe in Wedding Dress to stamp it onto the diecut banner piece. I used simple white pearls on the ends to dress it up. 

I hope you enjoyed this card! This would be perfect for Mother's Day coming up. Click on over to Crafter's Companion to see all the beautiful sets you can use to create your Mother's Day card and gifts!

Monday, April 20, 2015

Lawnscaping Challenge #104: Sketch

Good morning! Lawnscaping has a new challenge up today. See the image below for the sketch we are following. Lots of ways to go about this one :)


The sponsor for this challenge is Lawn Fawn! I hope you participate because they have SO many things to choose from to order...


And now for my project I created using this sketch:


For this card, I used a variety of different Lawn Fawn stamp sets to create this card. I wanted the sentiment and feathers to really pop, so I chose to use a black/chalkboard looking paper to use for my blocks behind the main focal point.

I trimmed them all down and grabbed my Memento Luxe ink in Wedding Dress and started having fun. 

The upper left block, I used the bow and ties of the bow from the Lawn Fawn Winter in the Park set, as well as the small star which I stamped in Radiant Neon, Electric Yellow. It's very subtle on there which is just what I wanted. 

For the upper right block, I used the three hearts that come in the Lawn Fawn, Love You a Latte set. I grouped them on my stamping block and started stamping, rotating the block to create the background.


The large block at the bottom of the card was fun. I used the dotted line from the Lawn Fawn Deck the Halls set and swirled it on my stamping block in the shape you see here. I then stamped the three berries in the open spaces from the same set. 

For my fun little cluster, I picked a large dark wood flower from my stash and adhered that to the card. I pulled the SMILE sentiment from the Lawn Fawn Into the Woods set and stamped it onto a piece of pattered paper from the Snow Day 6x6 Petite Paper Pack. I used my Versafine in Onyx Black to really make it pop! It's a juicy ink pad. Love it. 

I simply cut around that and used foam adhesive to glue to the card, right in the center of the flower. 
I took the two feathers from the Lawn Fawn, Dream set and stamped them with Versafine, Onyx Black onto some watercolor paper. I diecut them out using the coordinating Lawn Cuts set. 


To color them in, I used my water brush pen with Distress Ink in Scattered Straw, Radiant Neon in Electric Yellow, Electric Blue, and Memento in Nautical Blue and Tangelo. I painted the colors on so they blended nicely. I snuck in a piece of cording on the flower using my Lawn Trimmings Triple Pack Cord and used foam adhesive to stick on the feathers. I found a cool arrow chipboard piece in my stash that I snuck in there as well. It brought a little movement and color to the entire card! 

I hope you enjoyed my project and that you play along with the Lawnscaping Challenge this time. Check out the BLOG for full instructions and to link up your project. Happy crafting!

Saturday, April 18, 2015

Hello Hibiscus


Hello! I have a fun and bright card to share today. I have stepped out how I created this below along with links to each supply I used from Crafter's Companion. 


1. Cut/score orange cardstock base to 4.25x5.5. 

2. Cut small strips of Shimmering Cardstock in Green Envy. Set aside. 

3. Cut sheet for watercolor images. I wanted to create my own patterned paper with this card using a lot of color, so I stamped the small hibiscus image from the Stamp-It Australia, Floral Fancies set with Memento, Tuxedo Black. I used Spectrum Aqua Watercolor Markers to color them in. I referenced images on Google for different colors these gorgeous flowers. I used Yellow, Sunset, Spice, Gold, Amber, Orchid, Heather, Wildflower, Begonia, Blossom, Orange, Rose, Pink, Crimson, Burgundy, Scarlet and Red Violet. To make it look like a true patterned paper, I used Sea Green to color in around the flowers. I love the way this came out, so I'll be doing this technique way more often! 

4. To make a soft sentiment focal point on this bright and busy background, I used a small piece of vellum and diecut it using the Die'Sire Essentials, Rectangles and I embossed it using the top of the Embossing Folder, Christmas Elegance. I used the extra strong permanent tape runner behind where I glued the sentiment to hide it.

5. I then used some little enamel dots for interest on the sheer piece. 

6. I assembled it all and there you go!


Saturday, April 11, 2015

So Much Love


Good morning! I have a pretty spring card today for you using the newer Bebunni Floral Collection, Sweet Friend. I colored him in with Spectrum Noir Blendable Colored Pencils (114, 117, 119, 112, 120, 001, 113, 003, 005, 007, 009, 056, 057, 058, 041, 037, 042, 033). The soft glow around him, I used a water pen with the Spectrum Aqua Marker in Aquamarine. To help blend the pencils together, I use the Spectrum Noir Blending Solution and the Paper Stumps. These tools are fab to help get a nice, blended image. 


I have a dotted stencil in my supplies that I used with Distress Ink in Scattered Straw that I dabbed on gently around the bunny image. I just love the extra pop it gives to the image! You can do this with whatever stencils you have in your supplies. Crafter's Companion has great stencils HERE!


I assembled my card and adhered to a bright pop of magenta cardstock. I hope you enjoyed my project today!

Monday, April 6, 2015

Lawnscaping Challenge #103: Dimension

Good morning! We have a new challenge over at Lawnscaping today. This one is really fun - DIMENSION. See details in the image below.


The sponsor for this challenge is Ellen Hutson! The prize? A $25 gift certificate to the online store! 

Here is what I created for the challenge: 


I embossed a shimmery blue cardstock for the background. Then I built my little scene. I round cornered some white cardstock and used the green dotted paper from Lawn Fawn 6x6 Let's Polka Petite Paper Pack. I took the top of the green piece I cut out and just snipped the top to look like grass! I thought it was super cute. I then rounded the bottom corners and adhered to my white piece.

I used a yellow strip from the Sweater Weather Petite Paper Pack for the top of the piece. 

I took the sentiment, we bee-long together, and curved it on my acrylic block and stamped it onto the white piece with Memento in Tuxedo Black. 


For the bees, I stamped them first onto the white cardstock one at a time. I took Memento in Rose Bud to stamp the heart/dotted line image from the Lawn Fawn Bugs & Kisses set and then stamped the other bee at the other end. The bees were them stamped onto the same white cardstock and colored in with my Spectrum Aqua Watercolor Markers. I took the Aquamarine marker and used a water pen to apply a slight glow around the bee image stamped onto the white piece. It gave a little highlight to each bee. For the wings, I used my Wink of Stella pens in Silver and Clear to add in some glittery accents. I also used a Black Spica pen on the bee stripes, facial features, and antennae. I used foam adhesive to pop them up off the base. 


I needed a little dimension in the center of the heart, so I stamped the same heart/dotted line image onto the pink heart paper from the Lawn Fawn 6x6 Let's Polka Petite Paper Pack and adhered that with foam adhesive in the center. 

I hope you play along with the challenge! Be sure to follow the rules for the challenge and upload your project to the blog post! Good luck and have fun creating. 

Saturday, April 4, 2015

Together Forever


Good morning! I have a really clean and simple, but stunning card, to share with you today. I just love when simple cards pack a punch.

Today, I created this:


Here is what I did for the card (links for supplies below as well): 

1. Cut and scored cream colored cardstock base for card. Folded size is 4.25x5.5.

2. Cut chevron patterned paper to fit onto the card base. I typically trim my pieces to show a bit of the base border, and they measure 4x5.25. 

3. I used the Die'Sire Decorative Dies, Butterflies die with Shimmering Cardstock in Black Pearl for the butterfly. I used some simple yellow enamel dots on the center of the body for interest.


4. For the main panel, I took a large acrylic block and colored, in no particular way, sections onto the block itself with the Spectrum Aqua Watercolor Markers. I used Yellow, Sunflower, Spice and Begonia. Then I spritzed water onto the block. Doing this blends the colors together in a beautiful way. The next thing I did was pressed my watercolor stock onto the block (not vice versa like you would when you're stamping). I let it dry and then stamped my sentiment from the Sentimentals, Vintage stamp set onto the watercolor piece. 

5. I chose to turn the watercolor panel just slightly for interest against the chevron patterned paper. 

6. I used foam adhesive on the back of the butterfly and adhered it to the upper left corner. 

I hope you enjoyed this! Definitely check out all the amazing products at Crafter's Companion today! 

Lawn Fawnatics Challenge #8: Summertime Fun

  It's challenge time over at Lawn Fawnatics! This is challenge #8 which is summertime fun.  I mean, we are in the thick of summe...